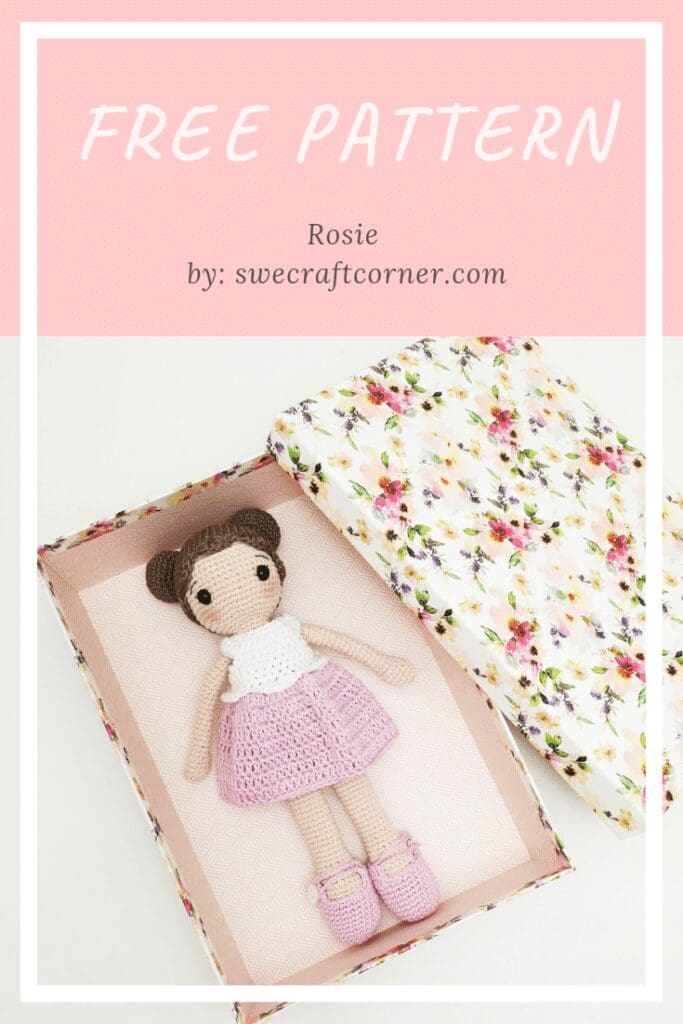
Free crochet pattern Amigurumi doll - Rosie
Disclaimer:
This Post may contain affiliated links, clicking on those links do not cost you a penny, unless you make a purchase in wich case i may get a small comission at NO extra cost to you! However i never recommend yarn or products i dont actualy like myself!
This post contain ads, the ads are the reason i can provide you with this pattern for free, if you want to help me provide free patterns i would love if you pinned this post to your pinterest and followed me!
If you want ad free and printable versions of my patterns you can find those in my shop.
First of all i want to tell you about the fact that i finally found the perfect light skin toned yarn. if you are also looking for the perfect yarn you can find the yarn i used here! I am adding this picture so you know exactly what shade i used
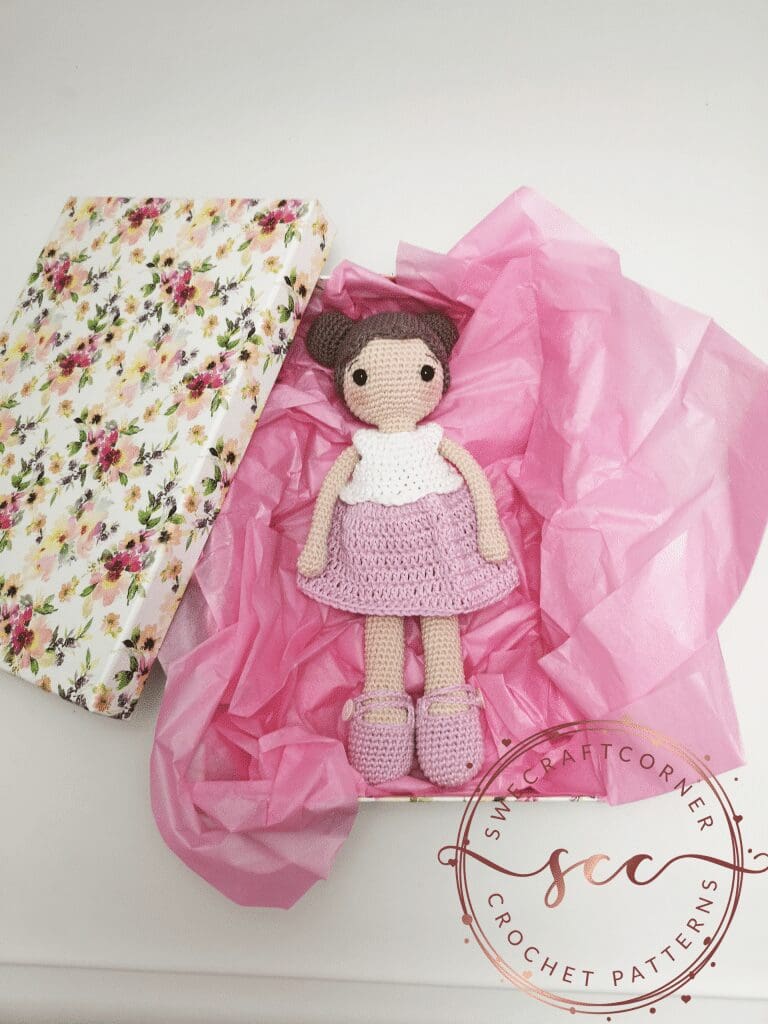
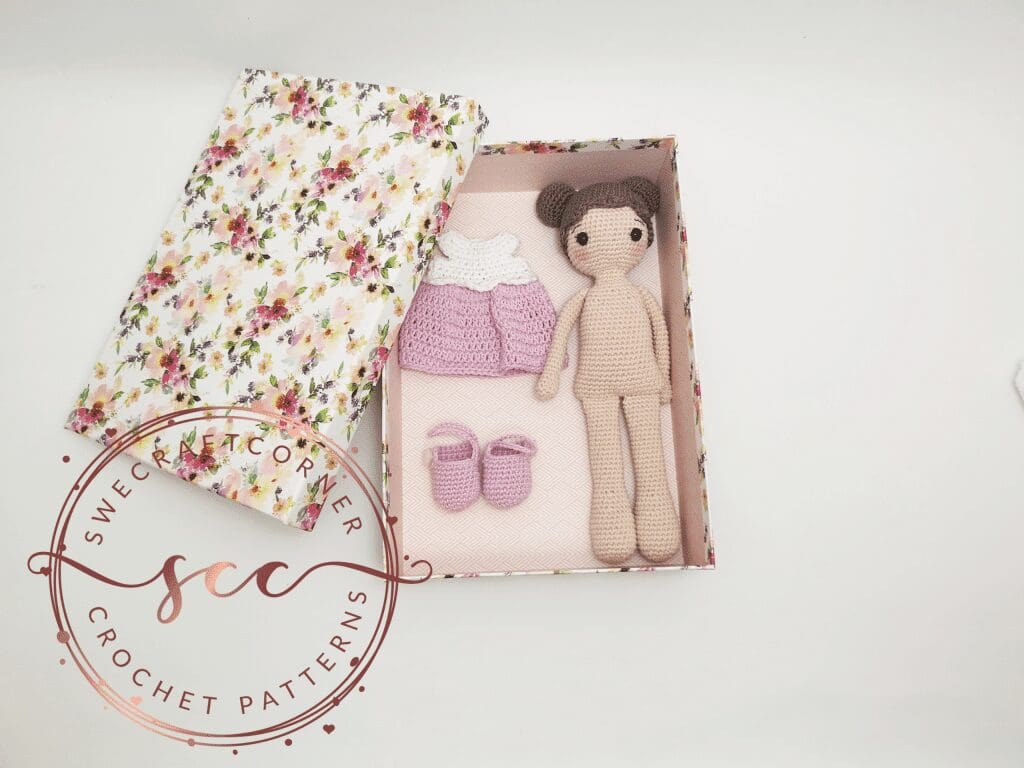
This is Rosie.
I would love it if you supported me by following me on instagram and on pinterest
Rosie is about 27 cm tall and loves cute dresses! She is made all out of the yarn Catania.
And after my kids i think she is the cutes creation i made, if i may say so myself. Her hair is removable, she is reverseble and can have to moods while she plays.
Now lets get to the pattern shall we?
First there is a few thing to go over.
You will need:
Yarn:
Approx. 65gr of skin colored cotton yarn. I used this
Cotton yarn for the dress hair and shoes in white, pink and brown
Hook:
2,0mm for the body
2,0mm or 2,5mm for the body depending on how firm you crochet
2,5mm for shoes
3,0mm for dress
Other materials:
Safety eyes
toy stuffing
Embroidery thread
stitch markers
Needle
3 small buttons
tinting of your choice
Gauge:
Doll – 1,4cmx1,4cm
Hair – 1,5cmx1,5cm
Dress – 1,7cmx1,7cm
Shoes – 1,5cmx1,5cm
Terms:
Sc – single crochet
Inc – 2 sc in same st
Dc inc – 2 dc in same st
Dec – 2 sc made into one
Mr – Magic ring
Ch – chain
Sl st – slip stitch
Dc – double crochet
st/sts – stitch/stitches
dc cluster – 5dc in same st
Pattern info:
The hands, feet/legs and body are made separately, the hands and feet/legs are then sewed onto the body.
All stitched are separated by , inc, 1sc, means you make 1 inc in the first st then move to next st and make 1 sc.
When a series of stitches is repeated these are placed within * - * the number this sequence is crochet is written after, for example x 6.
This is a printer friendly pattern. With each row written out to easily print out and cross off each row when done.
The number of stitches you should have after each row/round is completed is written at the end of each line within ( * ) Unless a slst or a turn is written you work in the round
Place a stitch marker in the first st of each round to make sure you always know where your last st is.
The pattern requires a smaller hook then your yarn suggests, to make sure there aren’t any holes to see the stuffing trough. Read the whole pattern before you start.
Lylah doll pattern
ROSIE
The whole doll is crochet with 2,0 mm crochet hook
Hands – Make 2
Start with mr.
1:6 sc in mr
2: *Inc* x 6 (12)
3-5: 1 sc in each st (12)
6:* dec, 1 sc in 2 sts* x 3 (9)
7-26: 1 sc in each st (9)
Do not fasten off,
leave a long tail to use when sewing the limbs to the body
Foot and leg – make 2
Start with a mr
1: 6 sc in mr
2: *Inc* x 6 (12)
3: *Inc, 1 sc* x 6 (18)
4: *Inc, 1 sc in 2 sts* x 6 (24)
5-11: 1 sc in each st (24)
12: *Dec, 1 sc in 4 sts* x 4 (20)
13-14: 1 sc in each st (20)
15: *Dec, 1 sc in 3 sts* x 4(16)
16-31: 1 sc in each st (16)
Stuff the legs, Do not fasten off, leave a long tail to use when sewing the limbs to the body
Body and head – make 1
Chain 19
1: In 2nd chain from hook make 2 sc, then 1 sc in 16 sts, 3 sc in last st, now working on the other side of chain, 1 sc in 17 sts. (38)
2-19: 1 sc in each st (38)
20: * dec, 1 sc in 6 sts* x 4, dec, 1 sc in 4 sts (33)
21: 1 sc in each st (33)
22: * dec, 1 sc in 4 sts* x 5, 1 sc in 3 sts (28)
23: 1 sc in each st (28)
24: * dec, 1 sc in 2 sts* x 7 (21)
25: *Dec, 1 sc in 2 sts* x 5, 1 sc in last st (16)
26-28: 1 sc in each st (16)
29: *Inc, 1 sc* x 8 (24)
30: *Inc, 1 sc in 2 sts* x 8 (32)
31: *Inc, 1 sc in 3 sts* x 8 (40)
32: *Inc, 1 sc in 4 sts* x 8 (48)
33-44: 1 sc in each st (48)
Fasten safety eyes if needed and stuff your work to here
45: * dec, 1 sc in 4 sts* x 8 (40)
46: * dec, 1 sc in 3 sts* x 8 (32)
47: * dec, 1 sc in 2 sts* x 8 (24)
48: *dec, 1 sc,* x 8 (16)
49: *dec* x 8 (8)
50: *dec* x 2
Stuff the rest of the head and sew the rest of the hole shut. Fasten yarn and cut loose ends.
Embroider eyelashes and eyebrows, tint the cheeks. Sew the arms and legs in place.
Tip, place the arms centered from the side so both front and back of doll is equal, then you can emborider 2 faces and the doll can have 2 moods. The legs are sewn in place using the space that is made from the starting chain of the body.
Would you like to save this?
Tip, when making the hair, test it on the dolls head to make sure you can take the hair of and put it back on, it shouldn’t fall of and I shouldn’t be to hard to put on, if that is the case adjust by changing hook size

Hair base
Start with a mr
1: 5 sc in mr
2: *inc* x 5 (10)
3: *Inc, 1 sc* x 5 (15)
4: *Inc, 1 sc in 2 sts* x 5 (20)
5: *Inc, 1 sc in 3 sts* x 5(25)
6: *Inc, 1 sc in 4 sts* x 5(30)
7: *Inc, 1 sc in 5 sts* x 5(35)
8: *Inc, 1 sc in 6 sts* x 5(40)
9: *Inc, 1 sc in 7 sts* x 5(45)
10-15: 1 sc in each st (45)
Edge
16: *sl st, skip 2 sts, 5 dc in next st, skip 2 sts* x 7 sl st into last
Buns - make 2
1: 6 sc in mr
2: *inc* x 6 (12)
3: *Inc, 1 sc* x 6 (18)
4: *Inc, 1 sc in 2 sts* x 6 (24)
5-8: 1 sc in each st (24)
9: *dec, 1 sc in 2 sts* x 6(18)
10: *dec, 1 sc x 6 (12)
Choose where you want to place the buns, stuff them with a little bit of filling and sew them in place.
Dress
With white yarn Ch 23
Upper part
1: Start in 6th st from hook *inc, 1 sc in 2 sts* x 6 (24) ch 1, turn
2: *inc, 1 sc in 3 sts* x 6 (30) ch 1, turn
3: 1 sc in each st (30) ch 1, turn
4: 1 sc in 4 sts, ch 6, skip 6 sts, 1 sc in 10 sts, ch 6, 1 sc in 4 sts (30) ch 1, turn
5: 1 sc in 4 sts, 6 sc in over the chain, 1 sc in 10 sts, 6 sc over the chain, 1 sc in 4 sts(30) ch 1, turn
6-8: 1 sc in each st (30) ch 1, turn
Row 9 will be worked 2 times, first in front loops only, then in back loops only, both will start from the same end
9.1: *Skip 2 sts, dc cluster, skip 2 sts, sl st* x 5 (30)
Fasten off the white yarn
Skirt, pink yarn
Fasten yarn in the back loop of last st of row 8
9,2: 1 sc in each st (30) sl st into the first st, ch 2(from now on we work in the round)
10: Dc inc in each st (60) sl st into first st, ch 2
11-16: 1 dc in each st (60) sl st tog, ch 2
Fasten off and sew in ends, sew a small button at the back of dress
Shoes
Pink cotton yarn
First shoe
1: 6 sc in mr
2: *inc* x 6 (12)
3: *Inc, 1 sc* x 6 (18)
4: *Inc, 1 sc in 2 sts* x 6 (24)
5-11: 1 sc in each st (24)
12: 1 sc in 16 sts, turn (16)
13: 1 sc in each st, turn /16)
14: Dec, 1sc in 12 sts, dec (14)
15: Dec, 1 sc in 10 sts, dec (12)
16: Ch 20, make 1 sc in last st from row 15, then 1 sc all along the front opening of the shoe. Fasten off and sew button in place
Second shoe
1: 6 sc in mr
2: *inc* x 6 (12)
3: *Inc, 1 sc* x 6 (18)
4: *Inc, 1 sc in 2 sts* x 6 (24)
5-11: 1 sc in each st (24)
12: 1 sc in 16 sts, turn (16)
13: 1 sc in each st, turn /16)
14: Dec, 1sc in 12 sts, dec (14)
15: Dec, 1 sc in 10 sts, dec (12)
16: 1 sc all along the front opening of the shoe, ch 20, sl st into last sc. Fasten off and sew button in place.
Dress your new super cute doll!