Free Pikachu Crochet Pattern
Calling all Pokémon fans! This adorable free Pikachu crochet pattern lets you make the perfect Pokémon amigurumi for your collection.
It is perfect for beginners and seasoned amigurumi makers alike. Whether you're creating it as a gift, a display piece, or just for fun, this sweet little plushie is sure to spark joy!
In this post, you’ll find the full written pattern with detailed step by step pictures to crochet your very own life sized Pikachu. Grab your yellow chenille yarn and let’s go catch some Pokémon—Pika pika!
PSST if you like to crochet pokemon! Catch the Charmander FREE crochet pattern!

Pattern Information
- Both legs are made separately and joined in the first body round.
- Cheeks, ears, and tail are made separately and sewn on.
- Stitch counts are given at the end of each round/row (in parentheses).
- Repeats are shown in square brackets [..] x times.
- When the same round is repeated, it is written as e.g. Round 2-6: {5 rounds}
- For rows worked back and forth, "turn" is indicated.
- Special stitches and techniques (sl st, working in BLO/FLO, color changes) are clearly noted.
- Read the whole pattern before you start crocheting to understand how the pattern is worked.
Materials
- Yarn: Chenille yarn in Yellow and brown for body, black for ears, DK weight cotton yarn in red for cheeks and a small amount of yellow and black for the face
- Paintbox simply Chenille: Yellow – 3 skeins in the color Lemon 04
There is currently a sale on Lovecrafts for this yarn!!
Paintbox simply Chenille: Brown – ¼ skein in the color Chocolate 16
Paintbox simply Chenille: Black ¼ skein in the color Pure black 15 - Hook: 2.5 mm for the cheeks and 4.5 mm for the body, arms, ears and tail, or as needed for your yarn
- Toy stuffing
- Yarn needle
- Scissors
- Thick cardboard
- pencil
Terms and Special Stitches
- Ch - chain
- sc - single crochet
- hdc - half double crochet
- sl st - slip stitch
- inc - increase (2 sc in the same st)
- dec - decrease (sc2tog)
- BLO - back loop only
- FLO - front loop only
- long sc - single crochet worked into the previous row (for tail detail)
- mr - magic ring
Pattern Notes
The stitch count at the end of each round/row is shown in parentheses.
Repeats are shown in square brackets: [..] x times.
For the tail, shaping and construction is described in detail to avoid confusion.
Use a yarn needle to sew parts together as indicated.
Feet (Make 2)
Starting with yellow chenille yarn and a 4.5mm crochet hook
Ch 4, starting in 2nd ch from hook
Round 1: 2 sc, 3 sc in last ch, now working on other side of chain, 1 sc, 2 sc in last st (8 sts)
Round 2-6: 1 sc in each st (8 sts) {5 rounds}
Round 7: 1 sc, in BLO - sl st in next 3 sts, 1 sc, 3 hdc (8 sts)
You are working the 3 sl sts into the back loops only for shaping.
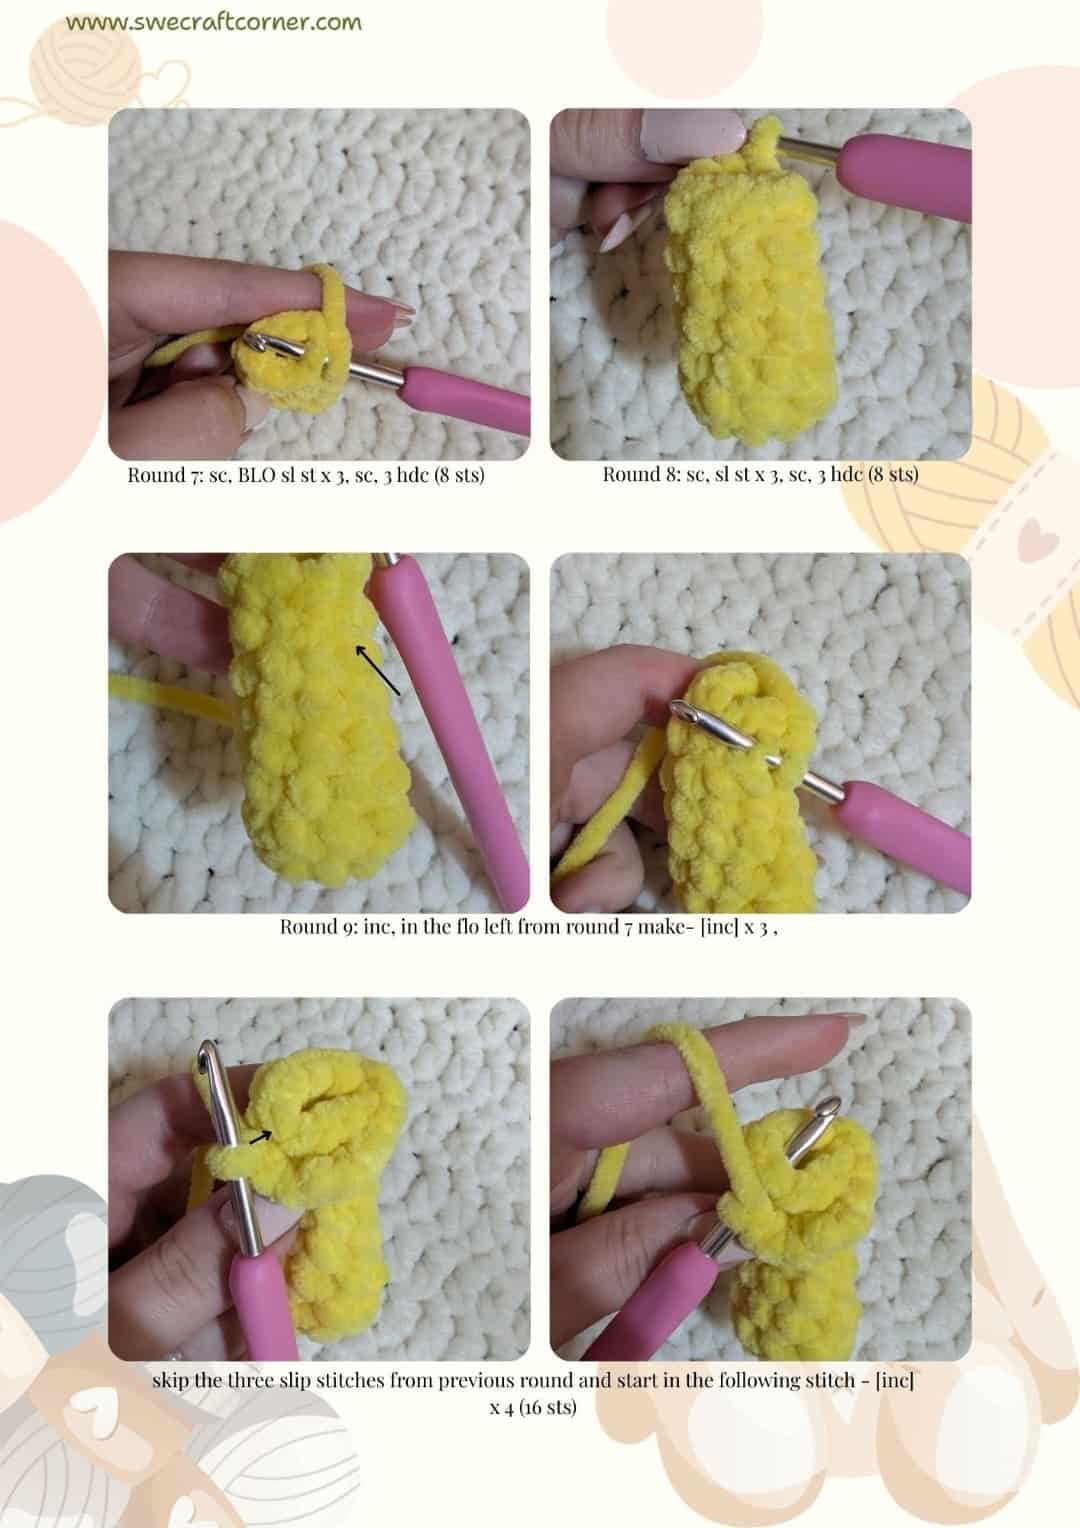
Round 8: 1 sc, sl st in next 3 sts, 1 sc, 3 hdc (8 sts)
Round 9: inc, in the FLO left from Round 7: [inc] x 3, skip the three slip stitches from previous round and start in the following st, [inc] x 4 (16 sts)
Clarification: The increases in the FLO will create a "fan" for the foot. Make sure you skip the sl sts made in Round 7.
Round 10: [inc, 1 sc] x 8 (24 sts)
Round 11: [inc, 2 sc] x 8 (32 sts)
Round 12: 1 sc in each st (32 sts)
Do not fasten off on the second leg—you will join the legs in the next part.
First leg: After finishing Round 12, make 4 more sc, then fasten off.
Second leg: Do not fasten off. Begin the following round of the body on the second leg.
Body
You will now join the legs and begin working in the round for the body. The following steps join the legs together.
Round 1 (Joining Round):
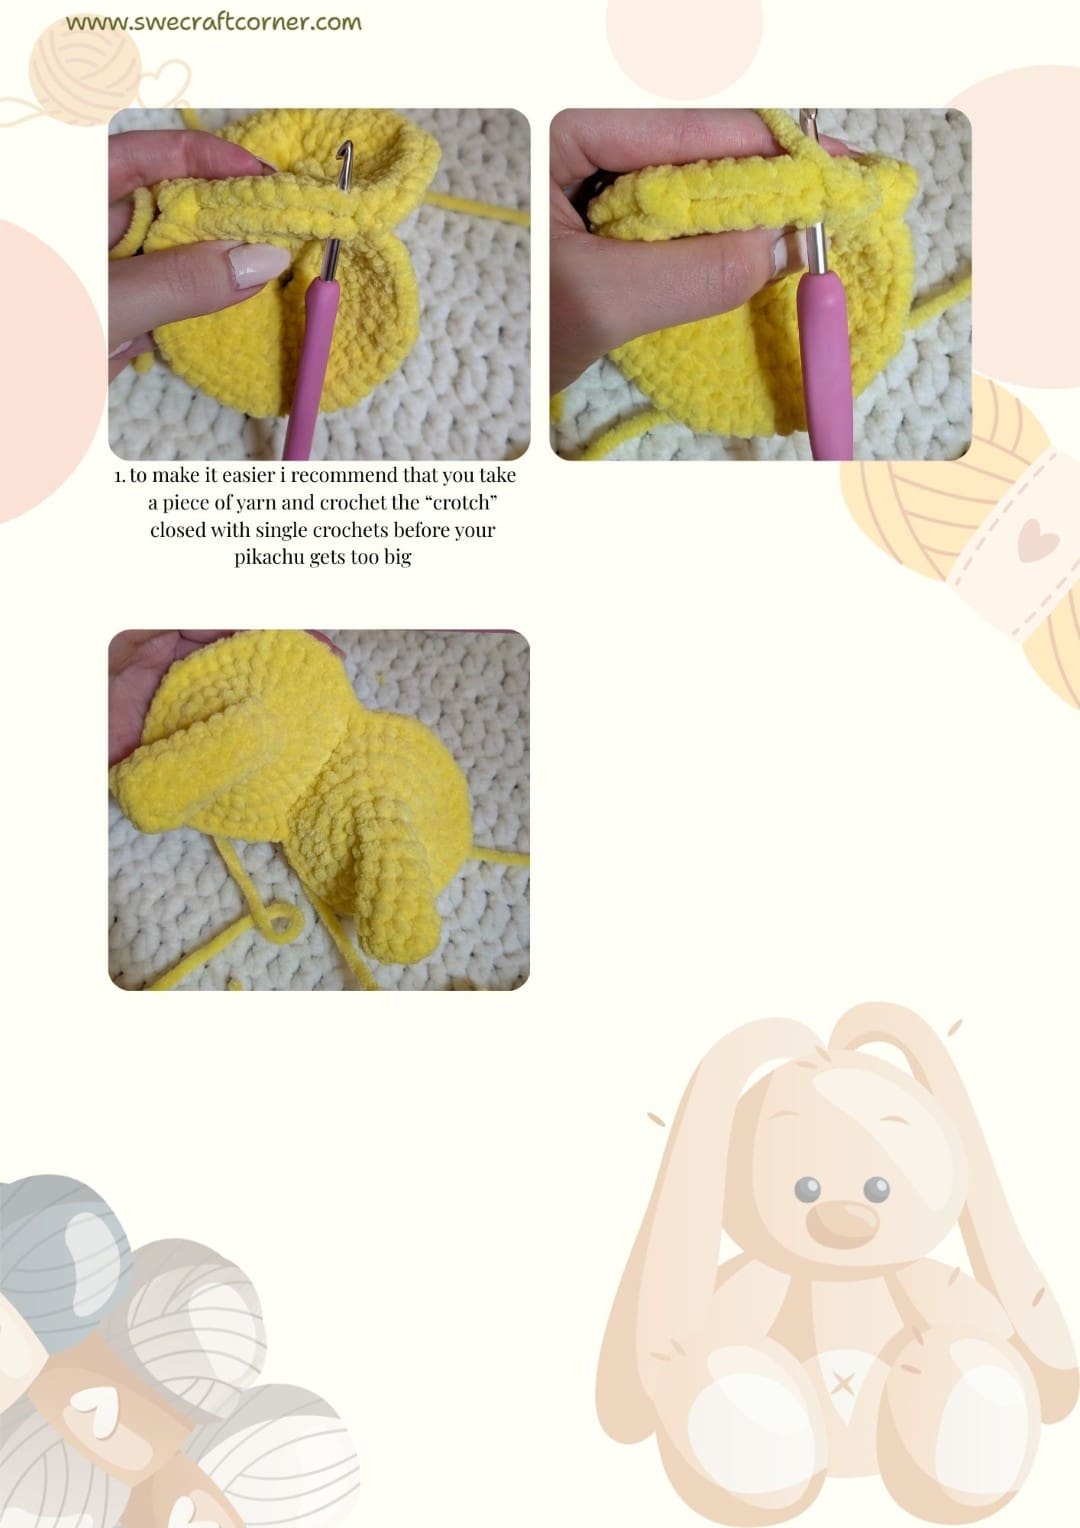
[inc, 3 sc] x 4, inc, 1 sc, (now working on the first leg, starting in the stitch next to where you finished), 1 sc, [inc, 3 sc] x 6, (now back to the second leg, 7 sts from the last stitch made), 3 sc, inc, 3 sc (62 sts)
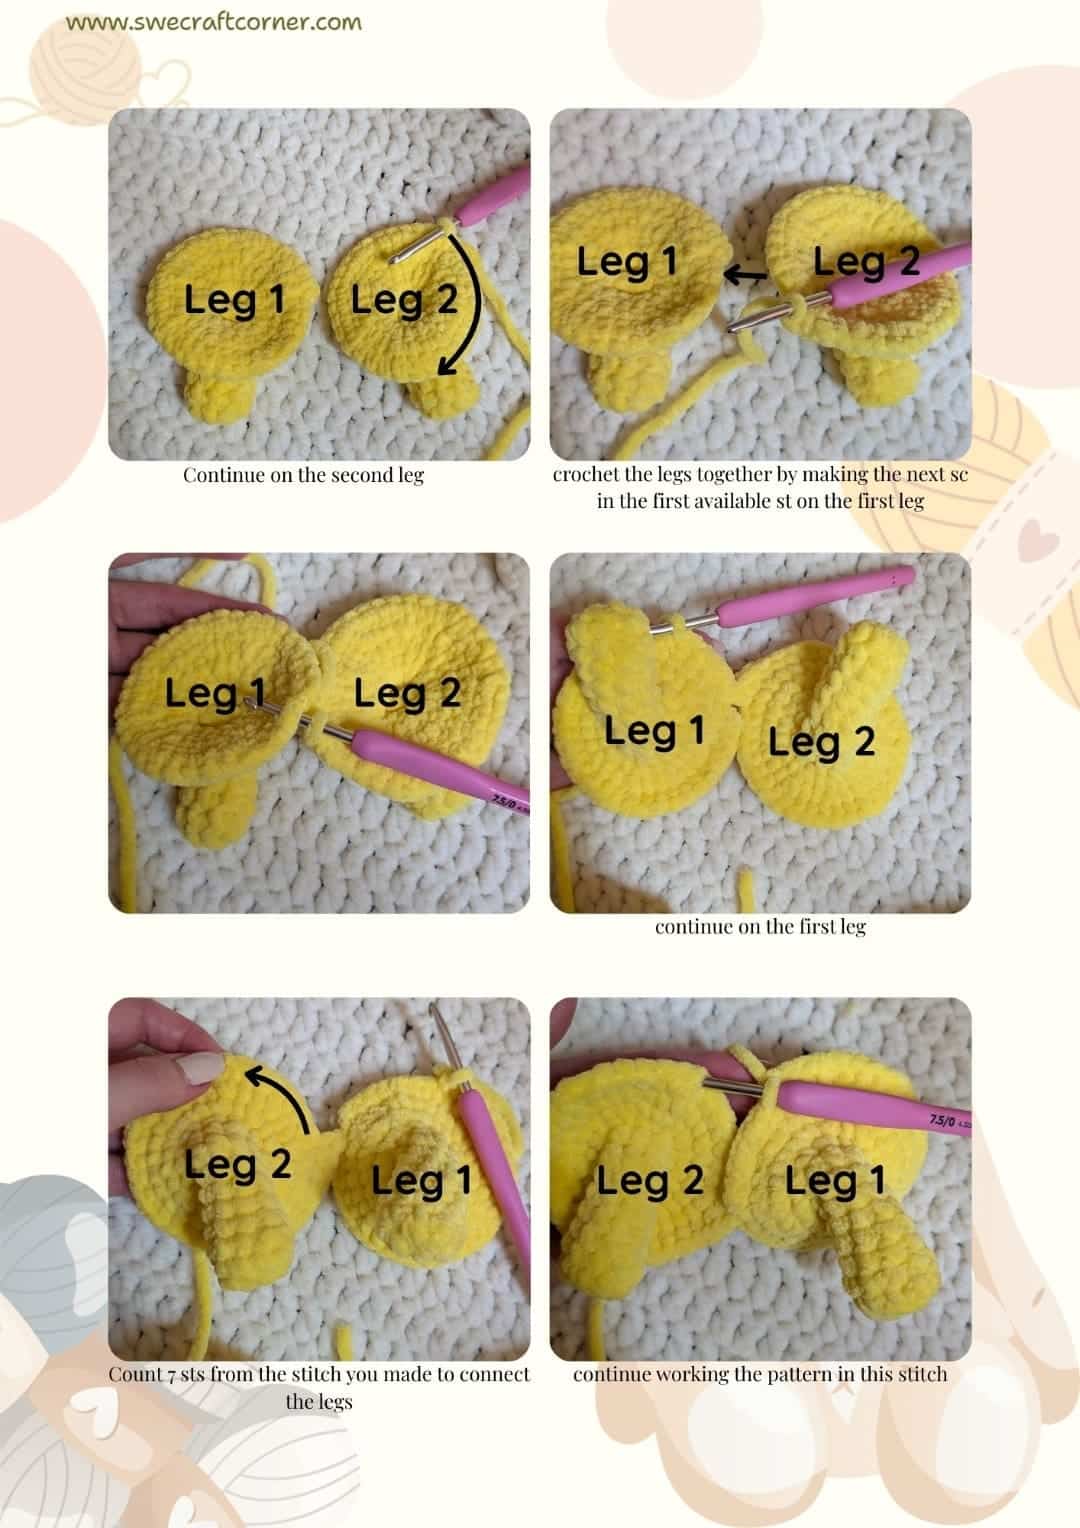
Clarification: Make sure you line up the feet and join so both are facing forward. The join will create the crotch area of the pikachu.
Round 2: 22 sc, sc2tog, 29 sc, sc2tog, 7 sc (60 sts)
Round 3: [inc, 5 sc] x 3, inc, 3 sc, inc, 3 sc, [inc, 5 sc] x 4, 10 sc (69 sts)
Round 4-10: 1 sc in each st (69 sts) {7 rounds}
Round 11: 6 sc, [sc2tog, 4 sc] x 3, 12 sc, [sc2tog, 4 sc] x 2, sc2tog, 2 sc, (change to brown yarn), 17 sc (63 sts)
Round 12: Continue with brown yarn - 4 sc, yellow yarn - 43 sc, brown yarn - 16 sc (63 sts)
Round 13: Brown yarn - 3 sc, yellow yarn - 1 sc, [sc2tog, 3 sc] x 3, 15 sc, [sc2tog, 3 sc] x 2, sc2tog, 2 sc, brown yarn - 15 sc (57 sts)
Round 14: Brown yarn - 2 sc, yellow yarn - 55 sc (57 sts)
Round 15: 37 sc, [sc2tog, 3 sc] x 4 (53 sts)
Round 16: [sc2tog, 3 sc] x 2, 43 sc (51 sts)
Round 17: 38 sc, brown yarn - 13 sc (51 sts)
Round 18: Brown yarn - 3 sc, yellow yarn - 36 sc, brown yarn - 12 sc (51 sts)
Round 19: Brown yarn - 2 sc, yellow yarn - 49 sc (51 sts)
Round 20: 4 sc, sc2tog, 29 sc, [sc2tog, 2 sc] x 4 (46 sts)
Round 21: sc2tog, 44 sc (45 sts)
Round 22-23: 1 sc in each st (45 sts) {2 rounds}
Round 24: [3 sc, sc2tog] x 9 (36 sts)
Round 25: [inc, 3 sc] x 9 (45 sts)
Round 26: [inc, 4 sc] x 9 (54 sts)
Round 27: 13 sc, [inc, 5 sc] x 5, 11 sc (59 sts)
Round 28-29: 1 sc in each st (59 sts) {2 rounds}
Round 30: 20 sc, inc, 2 sc, inc, 10 sc, inc, 2 sc, inc, 21 sc (63 sts)
Round 31-32: 1 sc in each st (63 sts) {2 rounds}
Round 33: 18 sc, [sc2tog, 2 sc] x 3, 5 sc, [sc2tog, 2 sc] x 3, 16 sc (57 sts)
Round 34: 14 sc, [sc2tog, 3 sc] x 2, 12 sc, [sc2tog, 3 sc] x 2, 11 sc (53 sts)
Round 35-40: 1 sc in each st (53 sts) {6 rounds}

Round 41: 6 sc, [sc2tog, 4 sc] x 7, sc2tog, 3 sc (45 sts)
Round 42: [sc2tog, 3 sc] x 9 (36 sts)
Round 43: [2 sc, sc2tog] x 9 (27 sts)
Round 44: [sc2tog, 1 sc] x 9 (18 sts)
Round 45: [sc2tog] x 9 (9 sts)
Want to make other plushies?
Have a look at my other Free crochet plushie patterns
Ears (Make 2)
Starting with black chenille yarn and a 4.5mm crochet hook
Round 1: 6 sc in mr (6 sts)
Round 2: [1 sc, inc] x 3 (9 sts)
Round 3: 1 sc in each st (9 sts)
Round 4: [2 sc, inc] x 3 (12 sts)
Round 5: 1 sc in each st (12 sts)
Round 6: [3 sc, inc] x 3 (15 sts)
Round 7: 1 sc in each st (15 sts)
Round 8: Black yarn – 4 sc, yellow yarn – 5 sc, Black yarn – 6 sc (15 sts)
Round 9: Black yarn – 3 sc, yellow yarn – 7 sc, Black yarn – 5 sc (15 sts)
Round 10: Black yarn – 2 sc, yellow yarn – 4 sc, inc, 4 sc, Black yarn – 4 sc (16 sts)
Round 11: Black yarn – 1 sc, yellow yarn – 12 sc, Black yarn – 2 sc, inc (17 sts)
Would you like to save this?
Round 12: Yellow yarn – 15 sc, Black yarn – 1 sc, yellow yarn – 1 sc (17 sts)
Round 13-20: 1 sc in each st (17 sts) {8 rounds}
Round 21: 1 sc, sc2tog, 3 sc, sc2tog, 1 sc, sc2tog, 3 sc, sc2tog, 1 sc (13 sts)
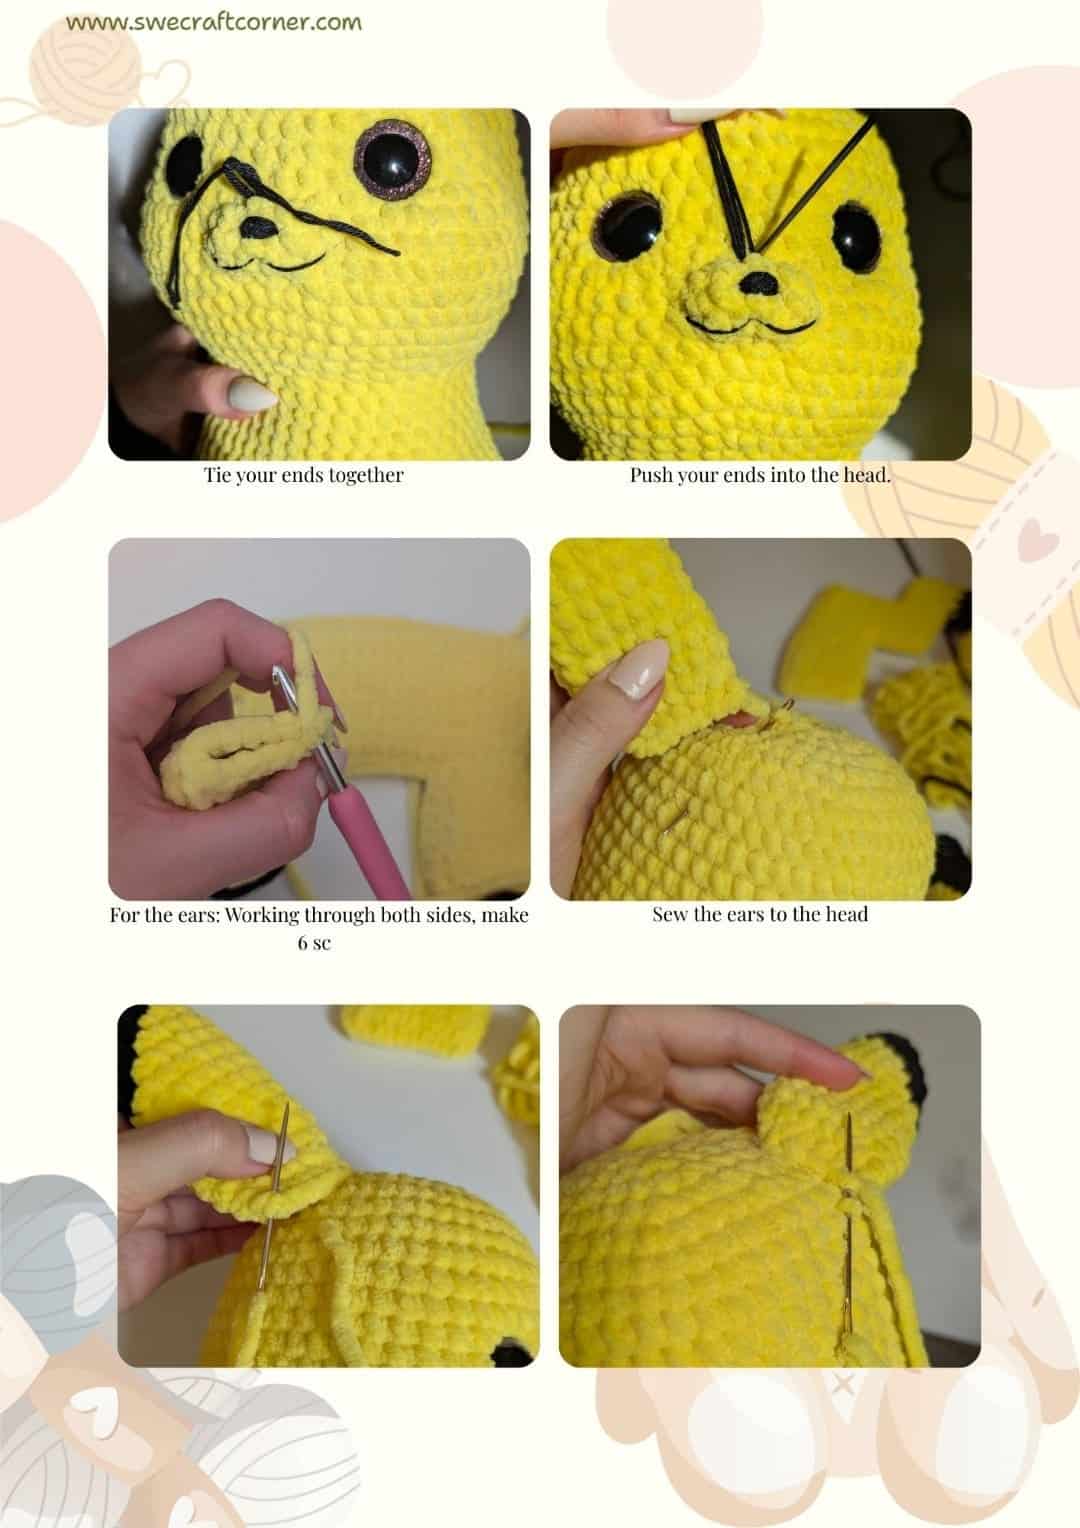
Stuff the ear lightly. Press the ends together (if your black line looks skewed, make an extra sc or remove one to adjust). Now work through both sides:
Round 22: 6 sc through both sides (6 sts)
Leave a long tail for sewing.
Arms (Make 2)
Starting with yellow chenille yarn and a 4.5mm crochet hook
Ch 5, starting in 2nd ch from hook
Round 1: inc, 2 sc, in last ch: 3 sc, now working on other side of chain, 3 sc (10 sts)
Round 2: [inc] x 2, 2 sc, [inc] x 3, 2 sc, inc (16 sts)
Round 3-4: 1 sc in each st (16 sts) {2 rounds}
Round 5: 1 sc, inc, 7 sc, inc, 6 sc (18 sts)
Round 6-7: 1 sc in each st (18 sts) {2 rounds}
Round 8: 1 sc, inc, 8 sc, inc, 7 sc (20 sts)
Round 9-12: 1 sc in each st (20 sts) {4 rounds}
Round 13: 1 sc, sc2tog, 8 sc, sc2tog, 7 sc (18 sts)
Round 14: 1 sc in each st (18 sts)
Round 15: 1 sc, sc2tog, 7 sc, sc2tog, 6 sc (16 sts)
Round 16: [sc2tog] x 2, 2 sc, [sc2tog] x 2, 2 sc (12 sts)
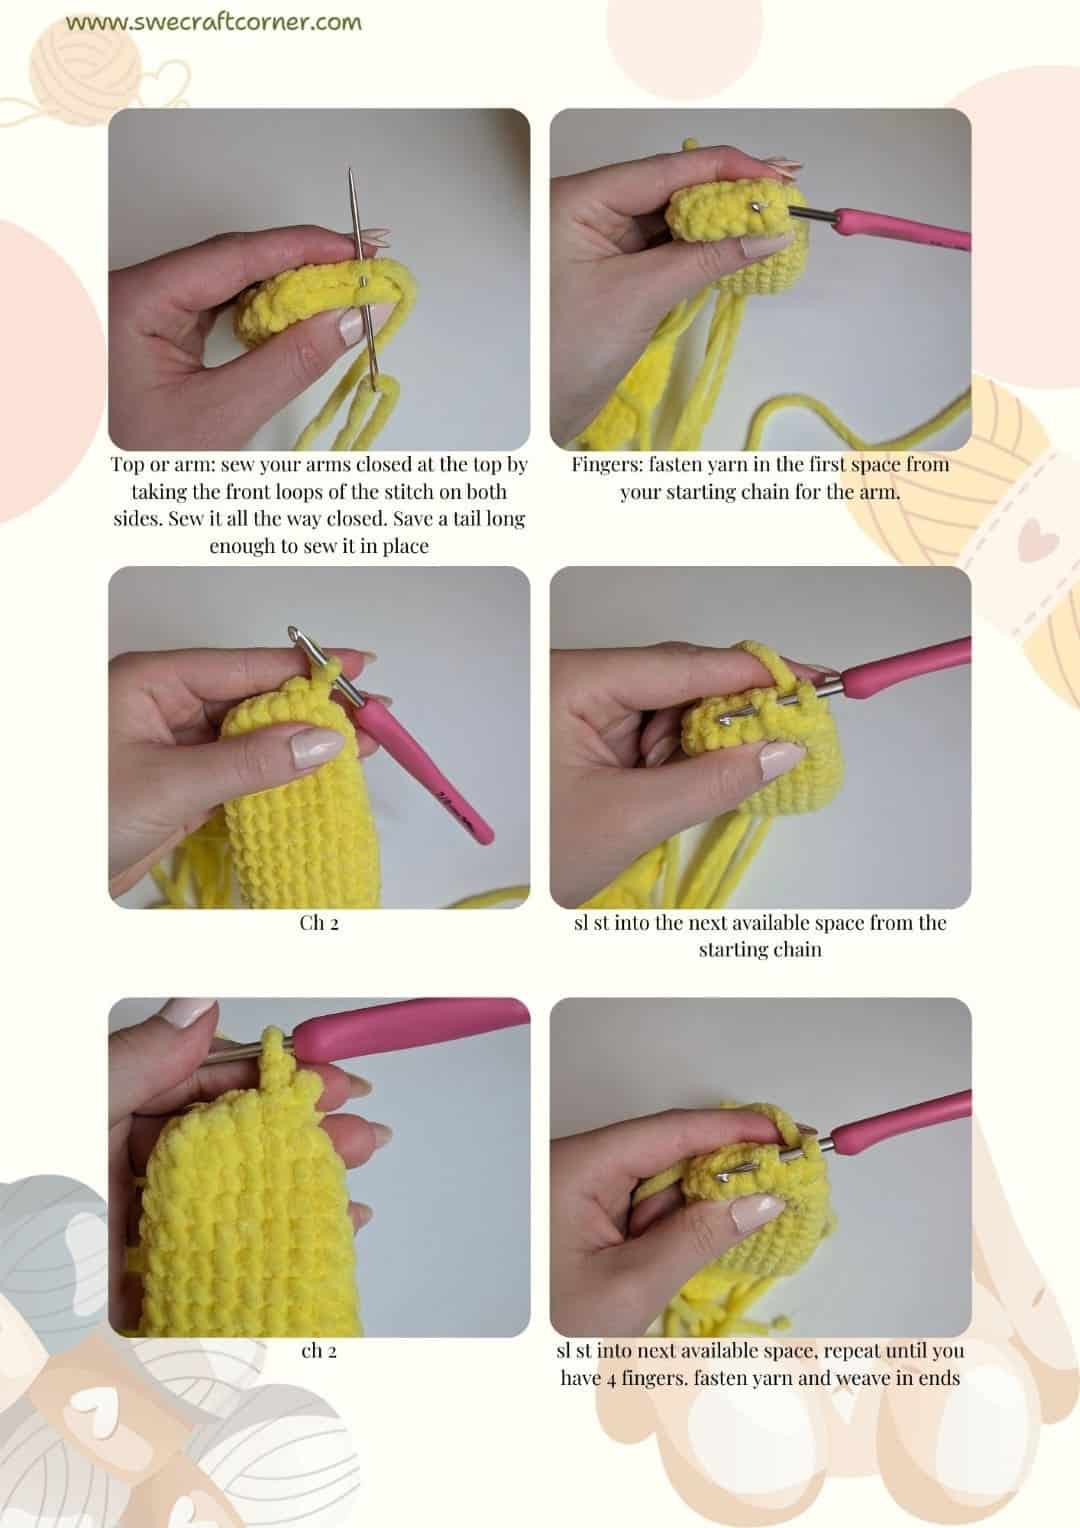
Stuff the arms lightly.
Top or arm: sew your arms closed at the top by taking the front loops of the stitch on both sides. Sew it all the way closed. Save a tail long enough to sew it in place.
Fingers: fasten yarn in the first space from your starting chain for the arm.
Ch 2
sl st into the next available space from the starting chain
ch 2
sl st into next available space, repeat until you have 4 fingers. fasten yarn and weave in ends
Tail (Make 2)
Starting with yellow chenille yarn and a 4.5mm crochet hook
With yellow yarn, ch 24. Begin working in 3rd ch from hook.
(After each row, ch 1 and turn unless otherwise stated.)
Row 1: 11 hdc, 11 sc (22 sts)
Rows 2-8: 1 sc in each st (22 sts) {7 rows}
Row 9: 8 hdc, 14 sc (22 sts)
Row 10: 8 sc (8 sts)
Clarification: Only work the next 8 sts, leaving the rest unworked. This shapes the tail's "tip."
Row 11: 8 sc, ch 8 (16 sts)
Work across the 8 sts just made, then chain 8 to extend the row.
Row 12: In 2nd ch from hook, 7 sc in the chain, 8 sc (15 sts)
Rows 13-17: 1 sc in each st (15 sts) {5 rows}
Row 18: 6 sc (6 sts)
Row 19: 6 sc (6 sts)
Row 20: Change to brown yarn, [sc, long sc] x 3 (6 sts)
"long sc" means insert hook into previous row to create a longer stitch for texture.
Rows 21-22: 6 sc (6 sts) {2 rows}
Row 23: 6 sc, ch 5 (11 sts)
Row 24: In 2nd ch from hook, 4 sc in the chains, 6 sc (10 sts)
Row 25-27: sc in each st across (10 sts) {2 rows}
Cut your yarn, fasten off and weave in your ends.
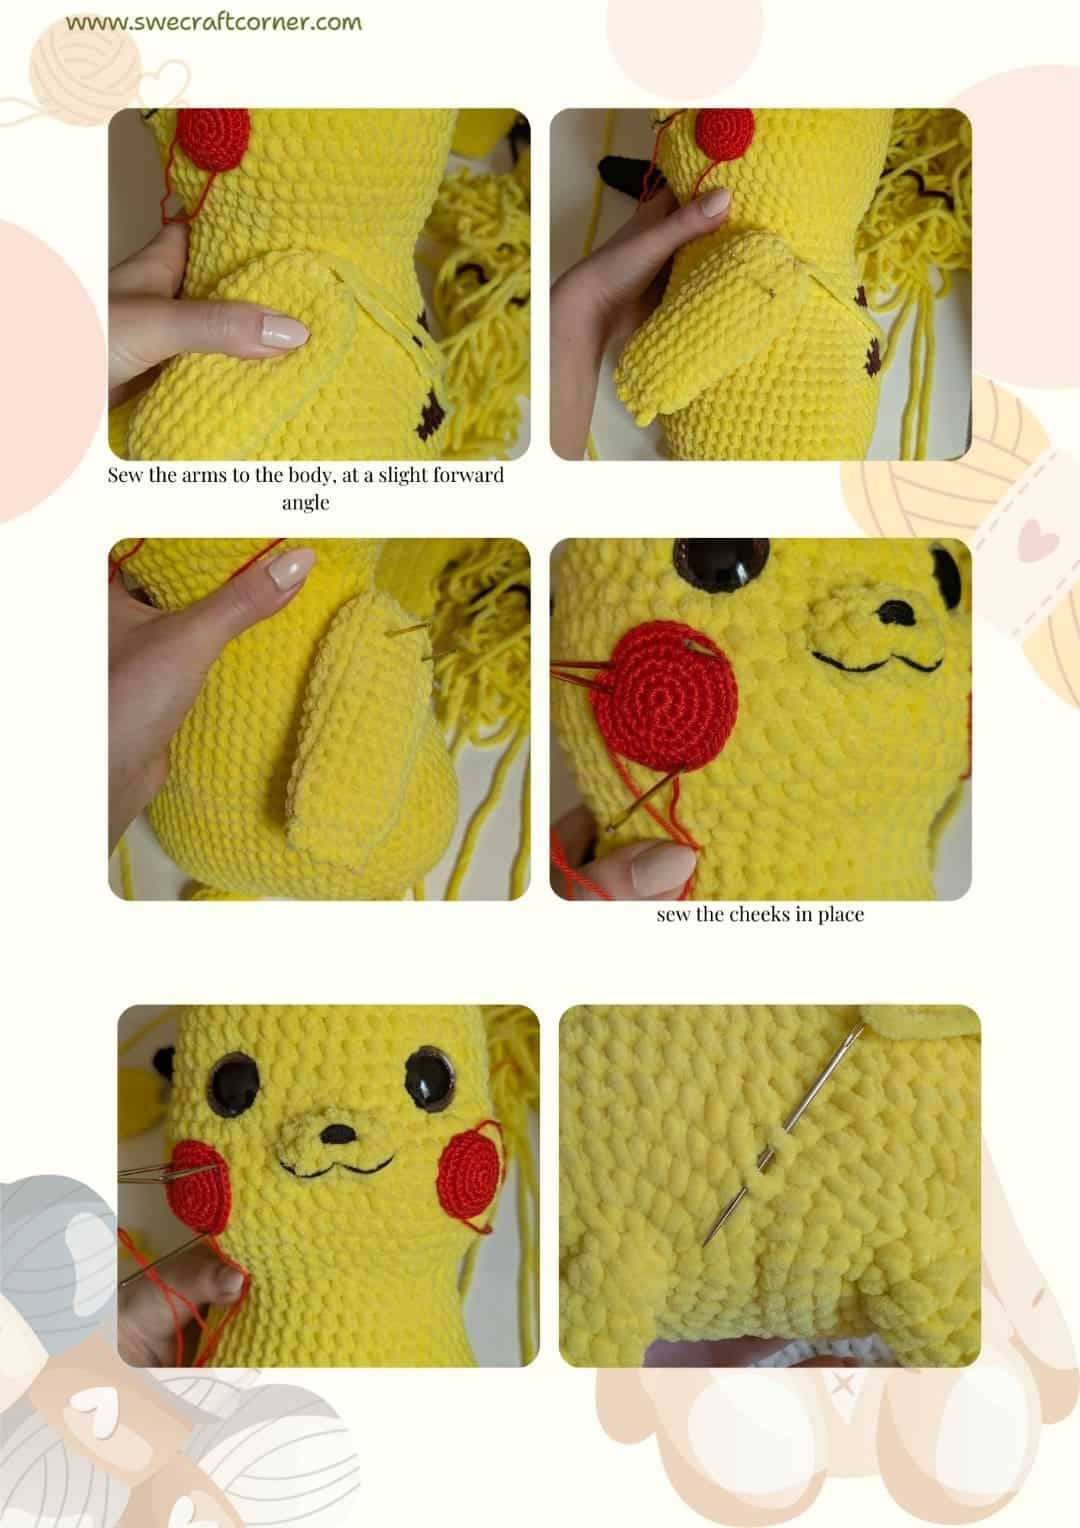
Cheeks (Make 2)
With red cotton yarn and a 2.5 mm crochet hook.
Make a magic ring, ch 1.
Round 1: 6 sc in mr (6 sts), sl st to first sc, ch 1
Round 2: [inc] x 6 (12 sts), sl st to first sc, ch 1
Round 3: [1 sc, inc] x 6 (18 sts), sl st to first sc, ch 1
Round 4: [inc, 2 sc] x 6 (24 sts), sl st to first sc, ch 1
Round 5: sc in each st around (24 sts)
For the last round, instead of finishing with a slip stitch finish with a false stitch for a nice and even look.
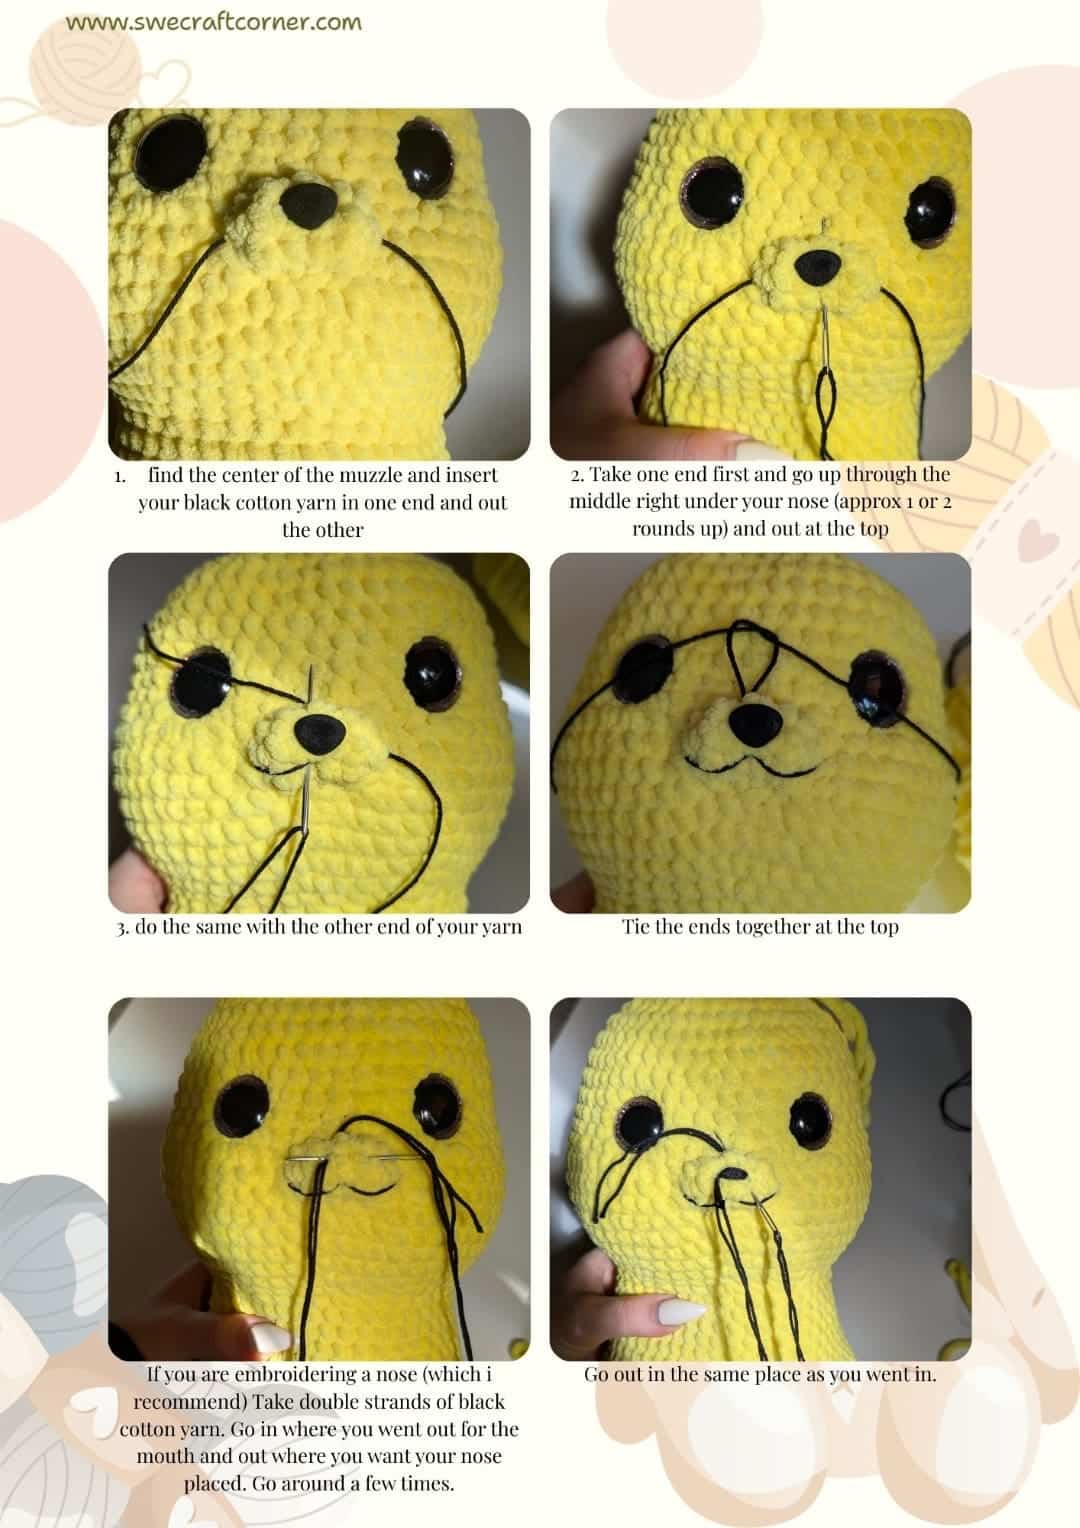
Assembly
Create the muzzle shape.
Sew the ears to the head at the desired position.
Sew arms and legs to the body.
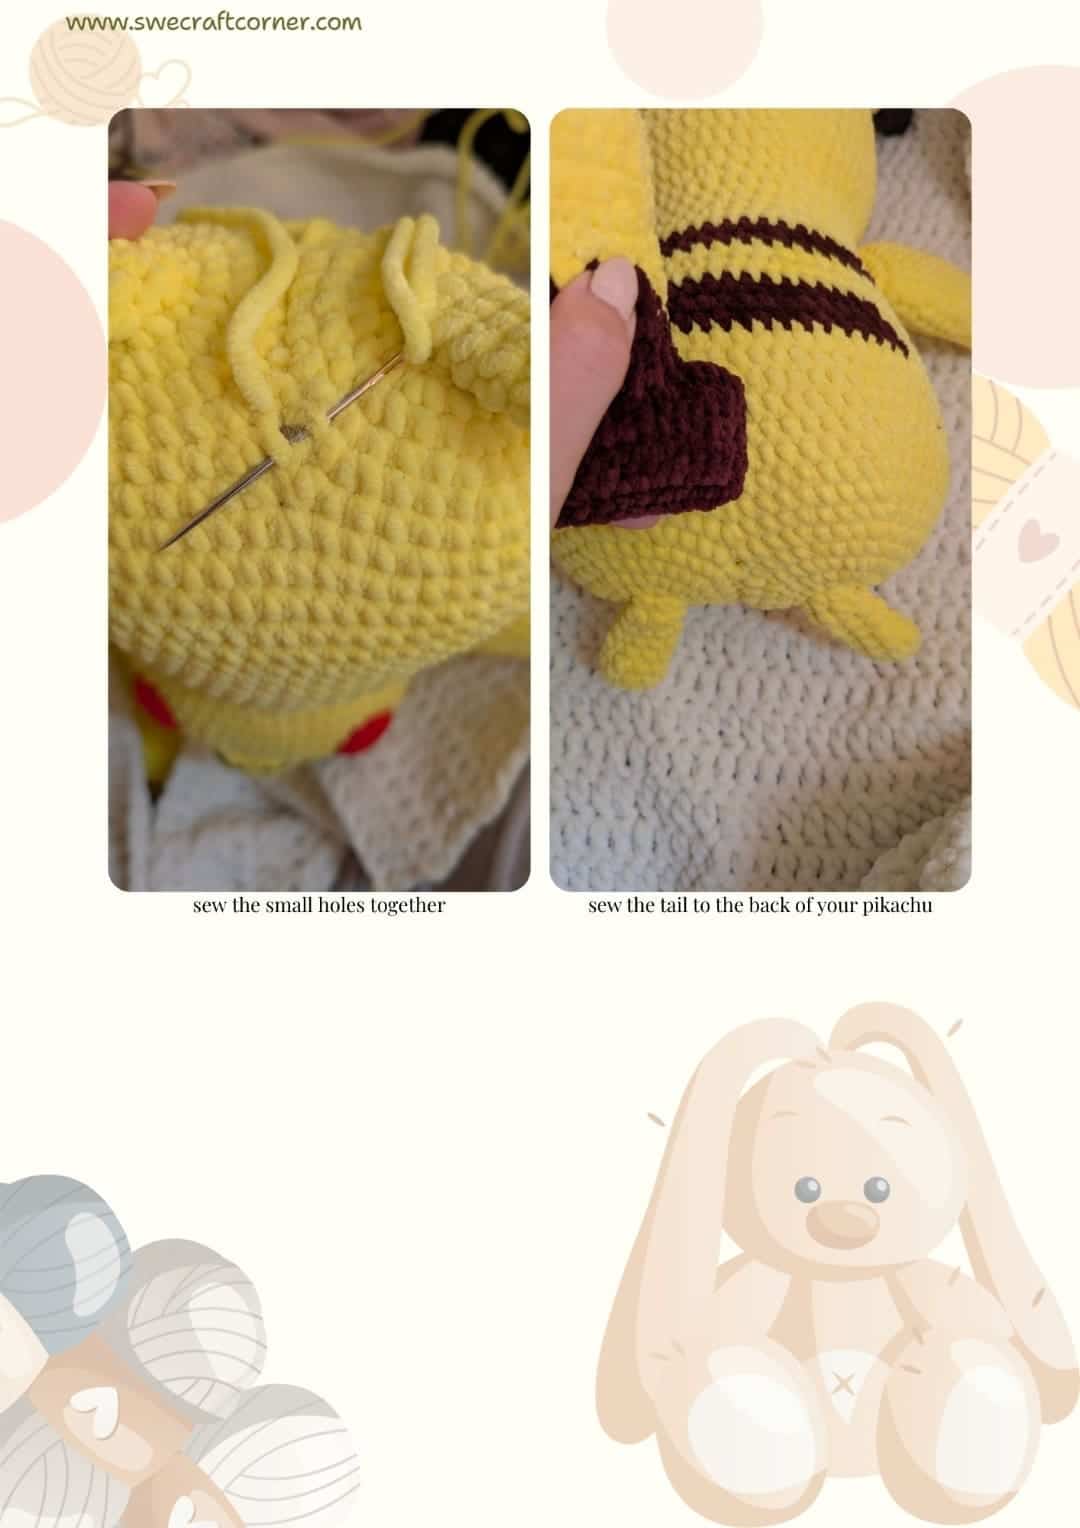
Cut the cardboard and finish your tail.
Sew the tail in place as shown in photos or at your chosen spot.
Sew the cheeks onto the face.
Weave in all ends.
Making the tail:
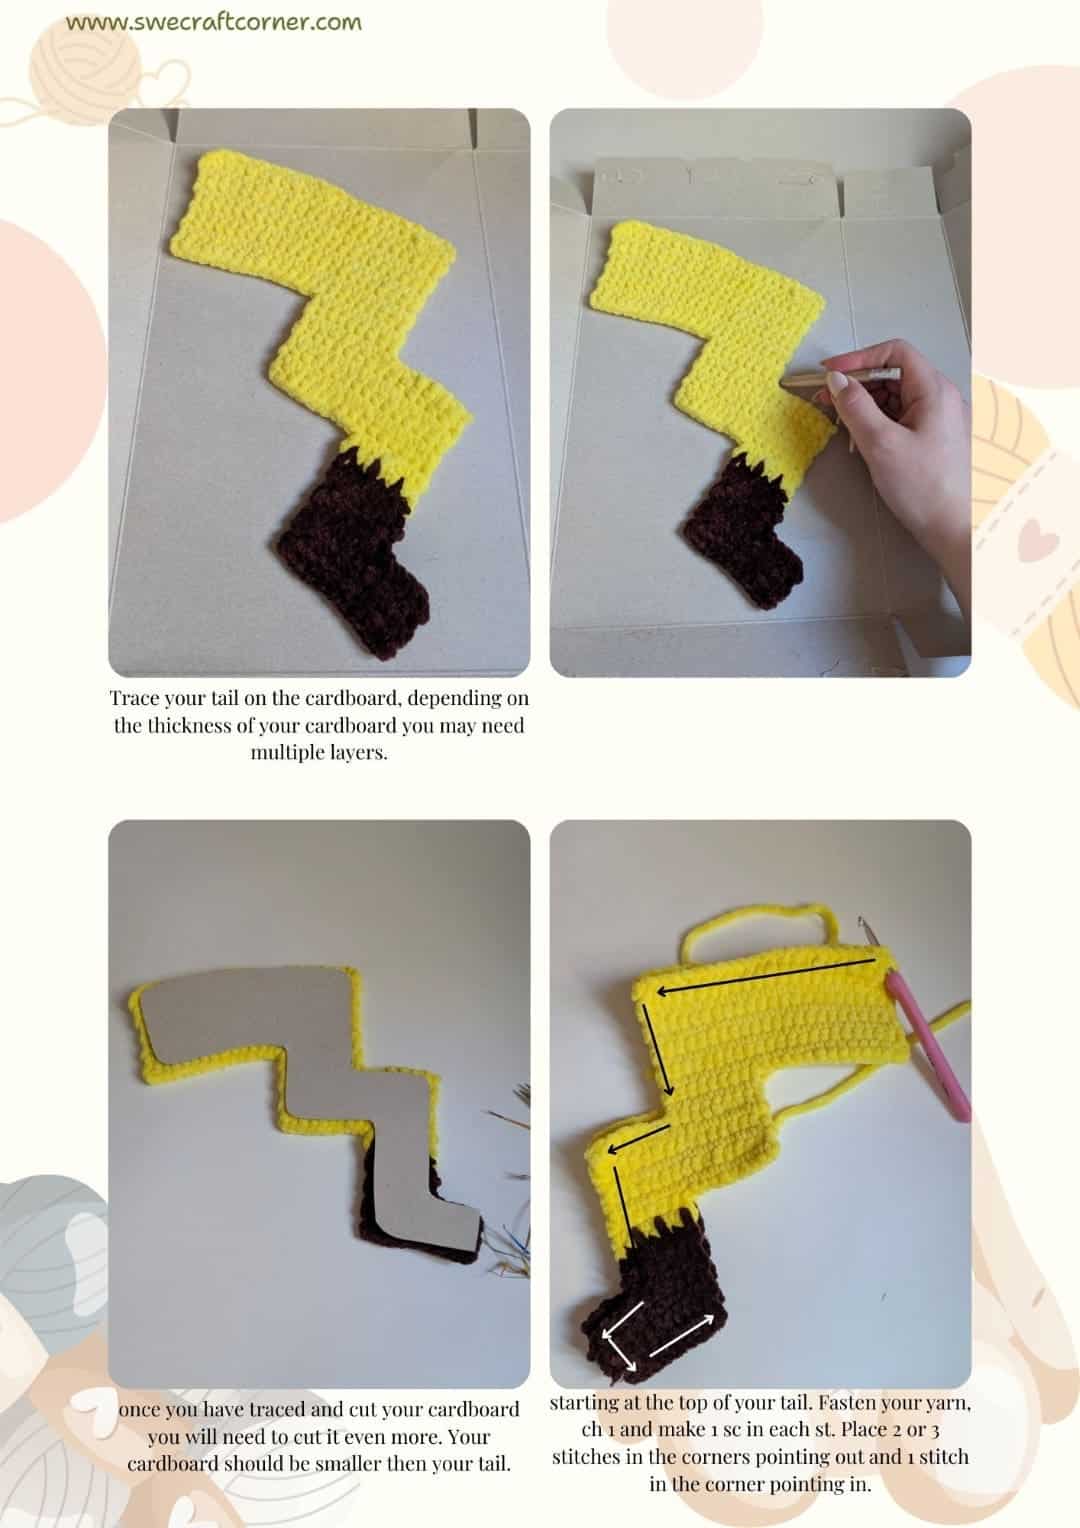
Trace your tail on the cardboard, depending on the thickness of your cardboard you may need multiple layers.
Once you have traced and cut your cardboard you will need to cut it even more. Your cardboard should be smaller than your tail.
starting at the top of your tail. Fasten your yarn, ch 1 and make 1 sc in each st. Place 2 or 3 stitches in the corners pointing out and 1 stitch in the corner pointing in.
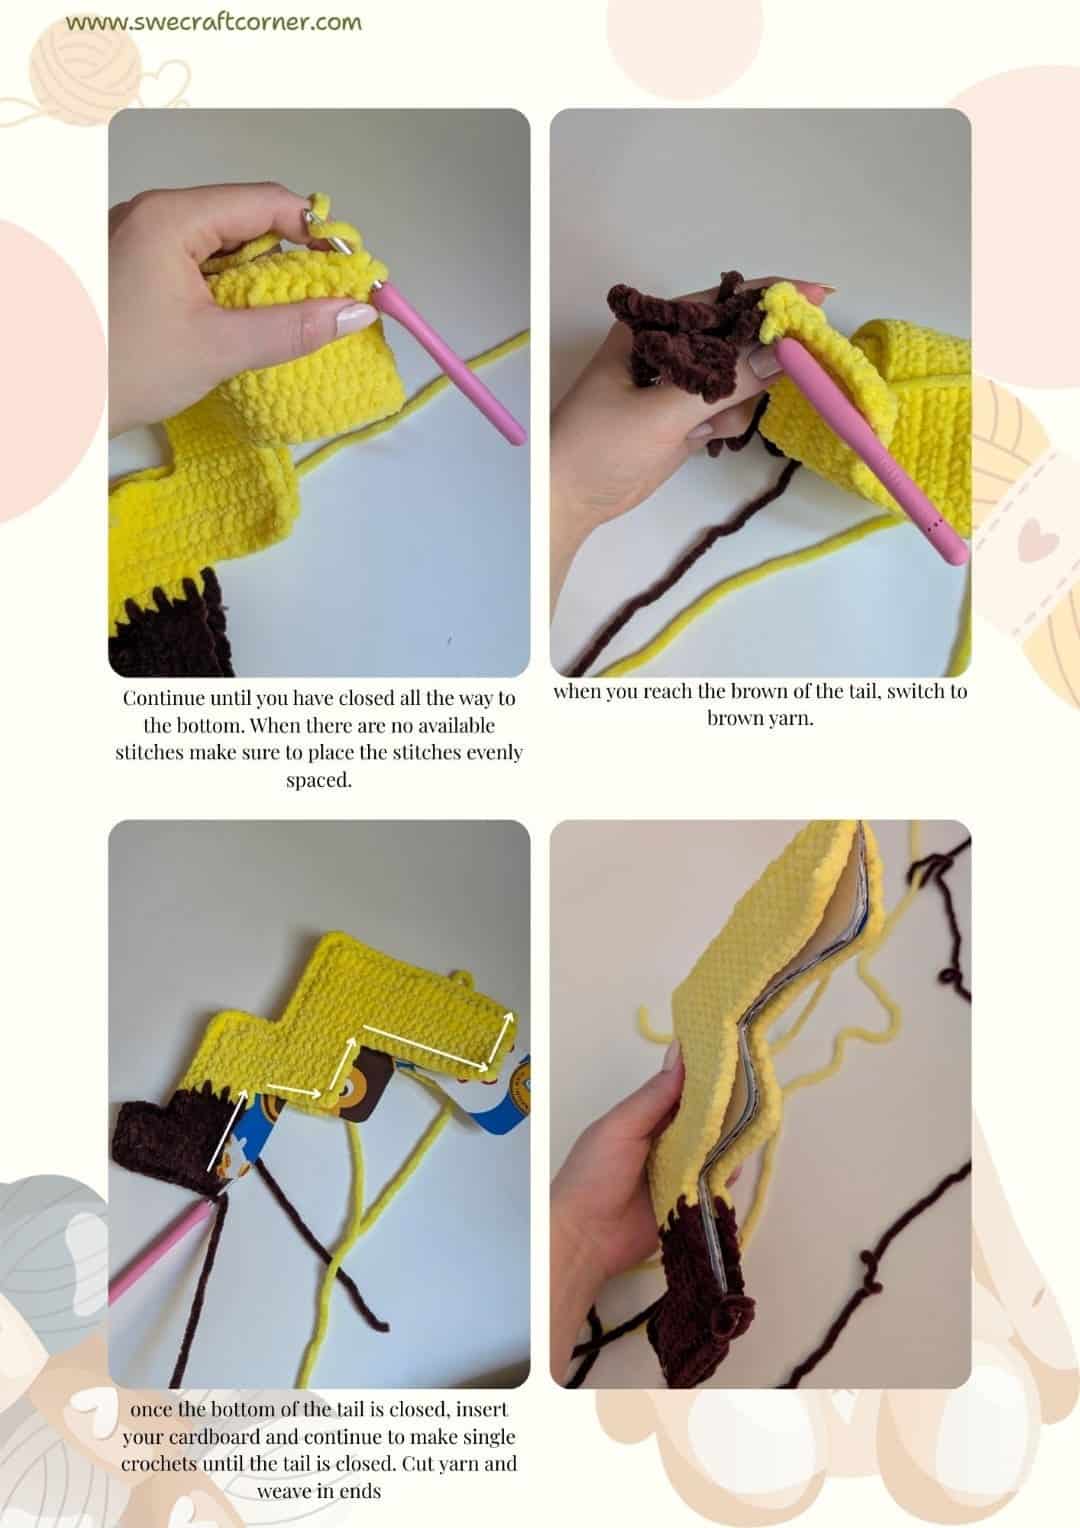
Continue until you have closed all the way to the bottom. When there are no available stitches make sure to place the stitches evenly spaced.
When you reach the brown of the tail, switch to brown yarn.
Once the bottom of the tail is closed, insert your cardboard and continue to make single crochets until the tail is closed. Cut yarn and weave in ends
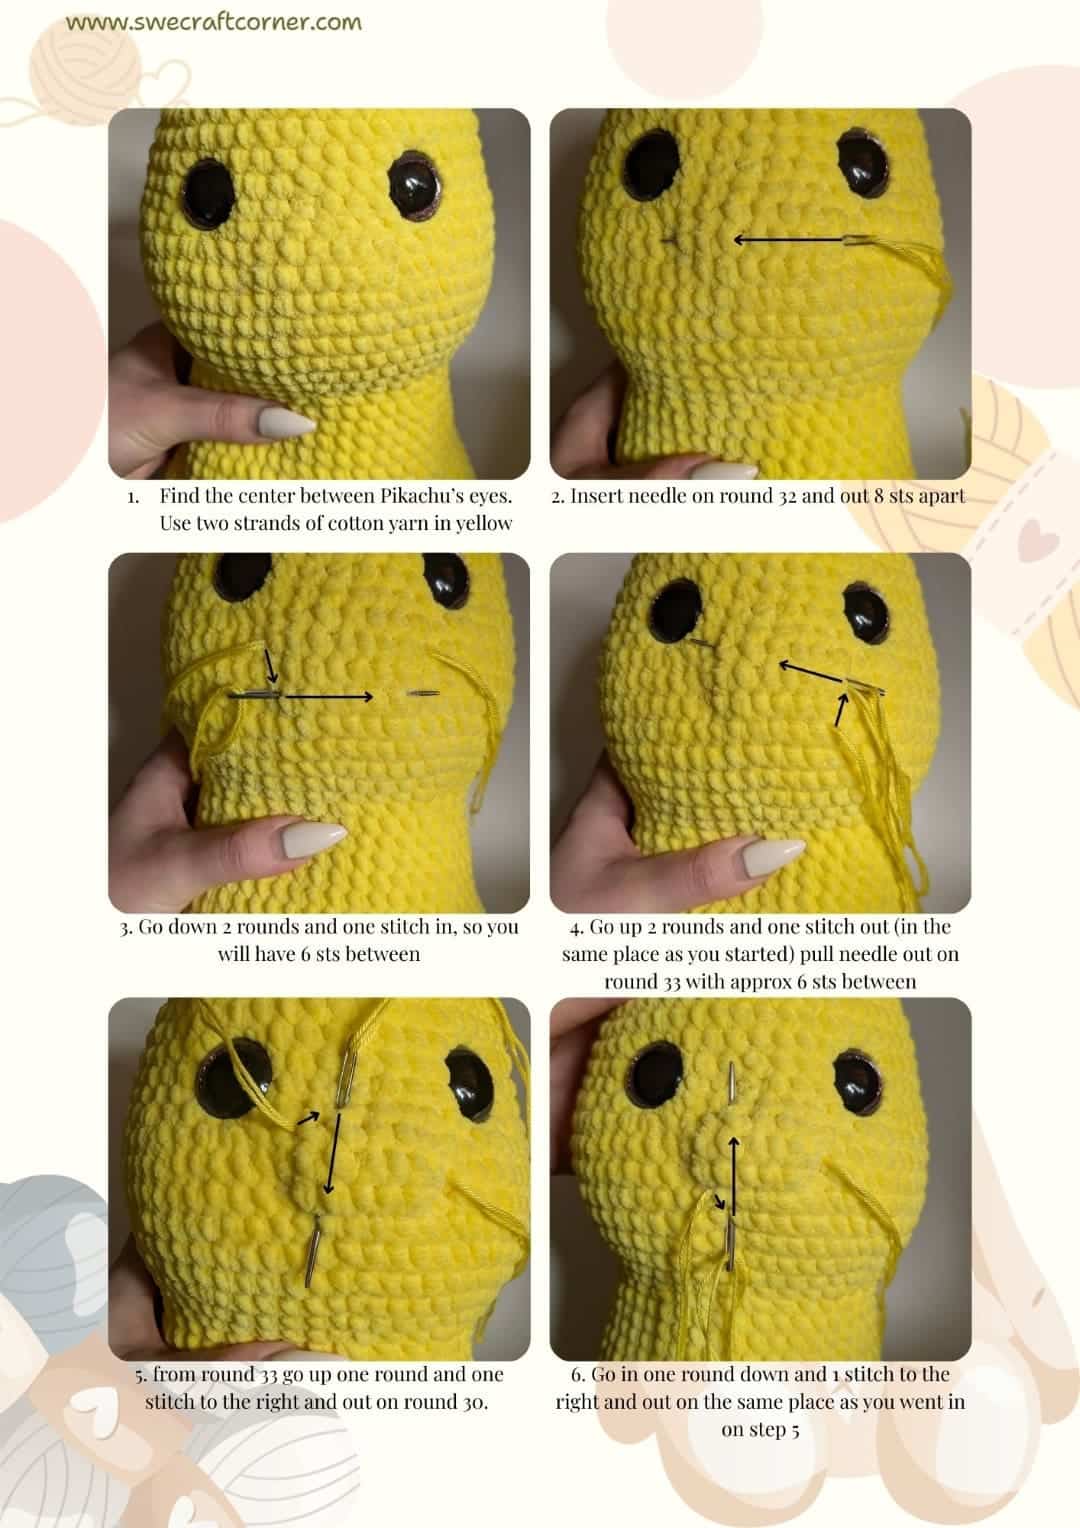
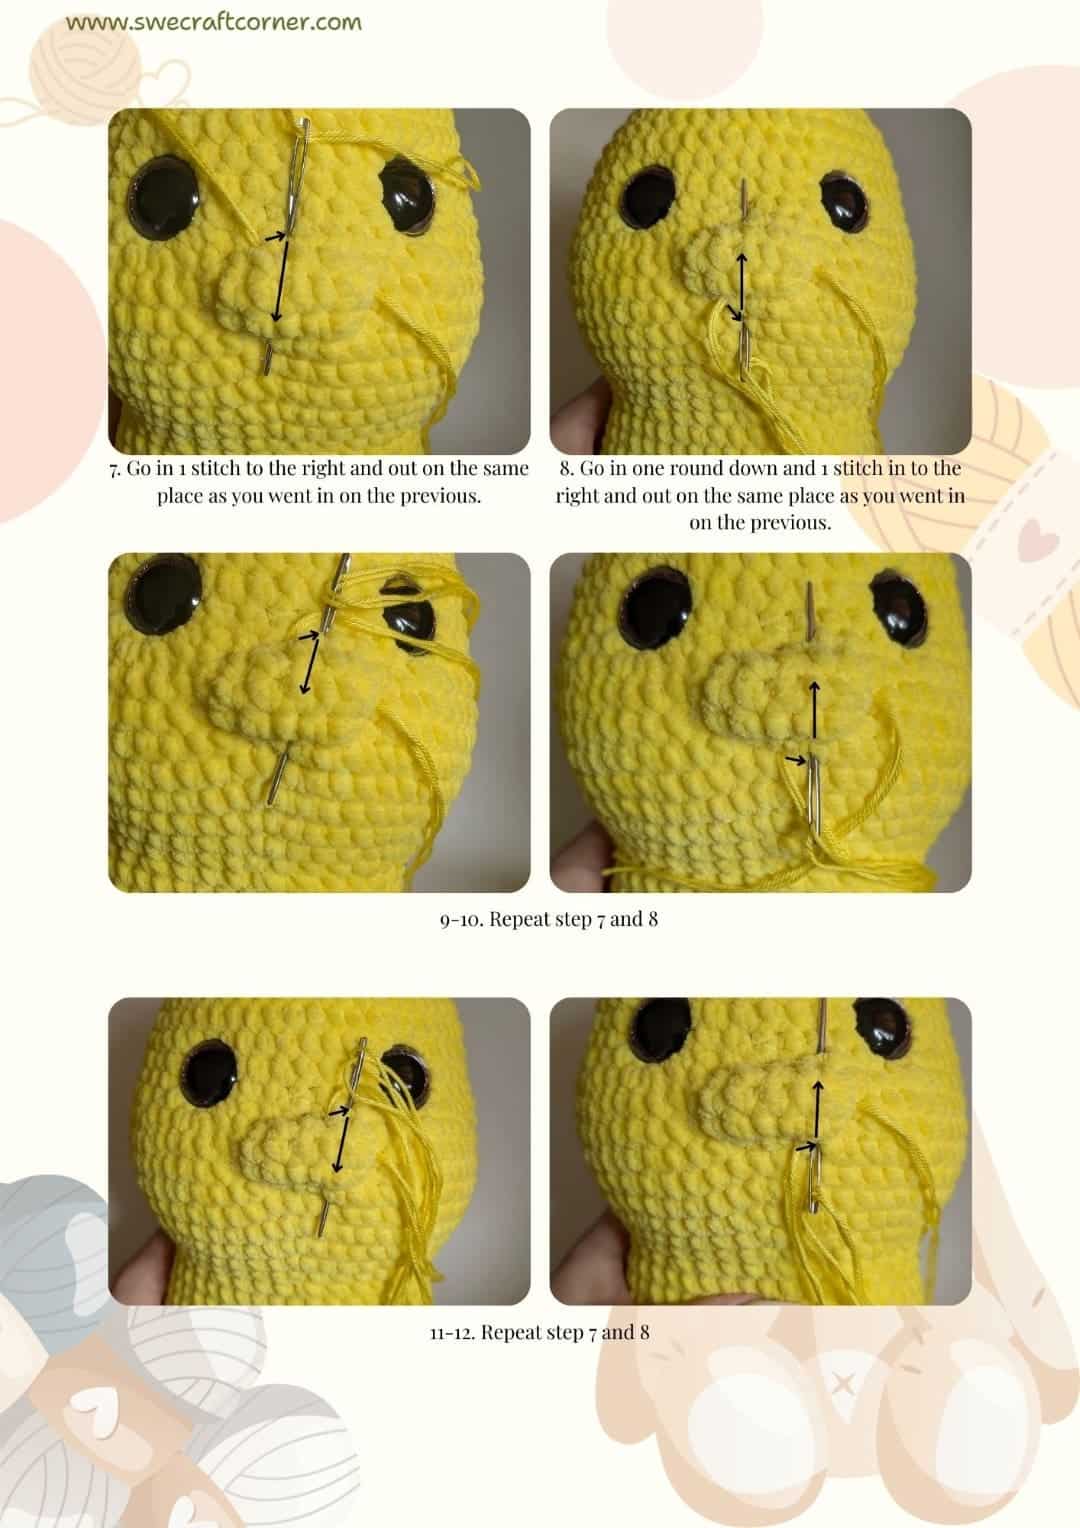
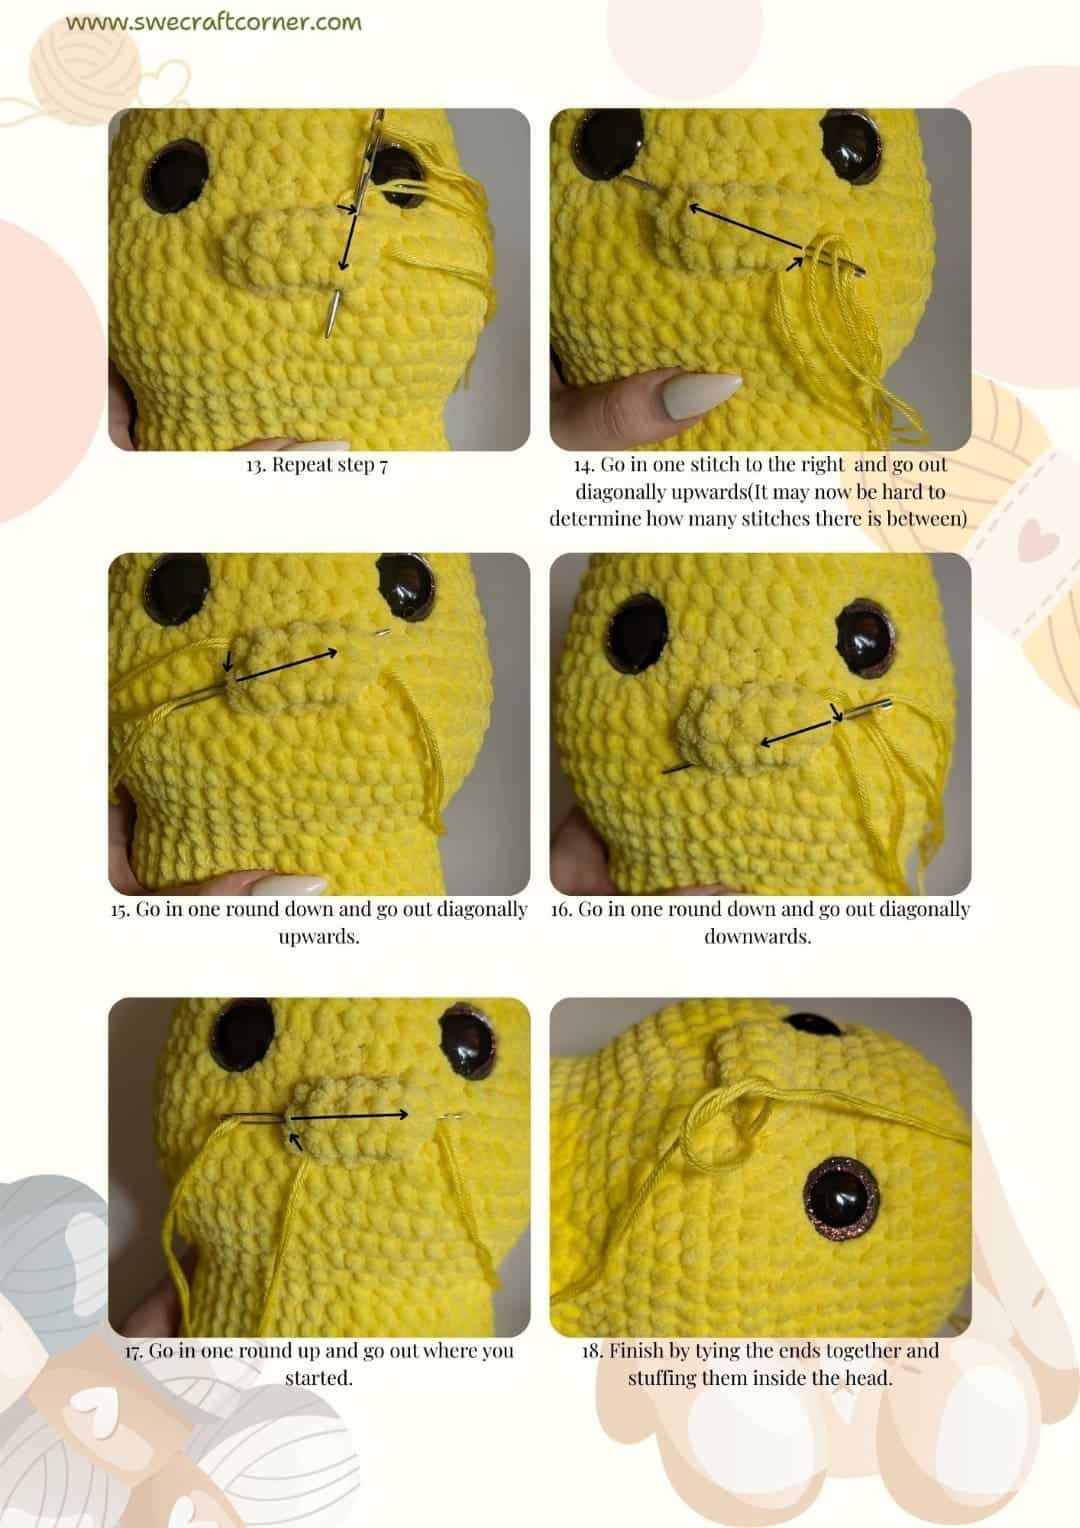
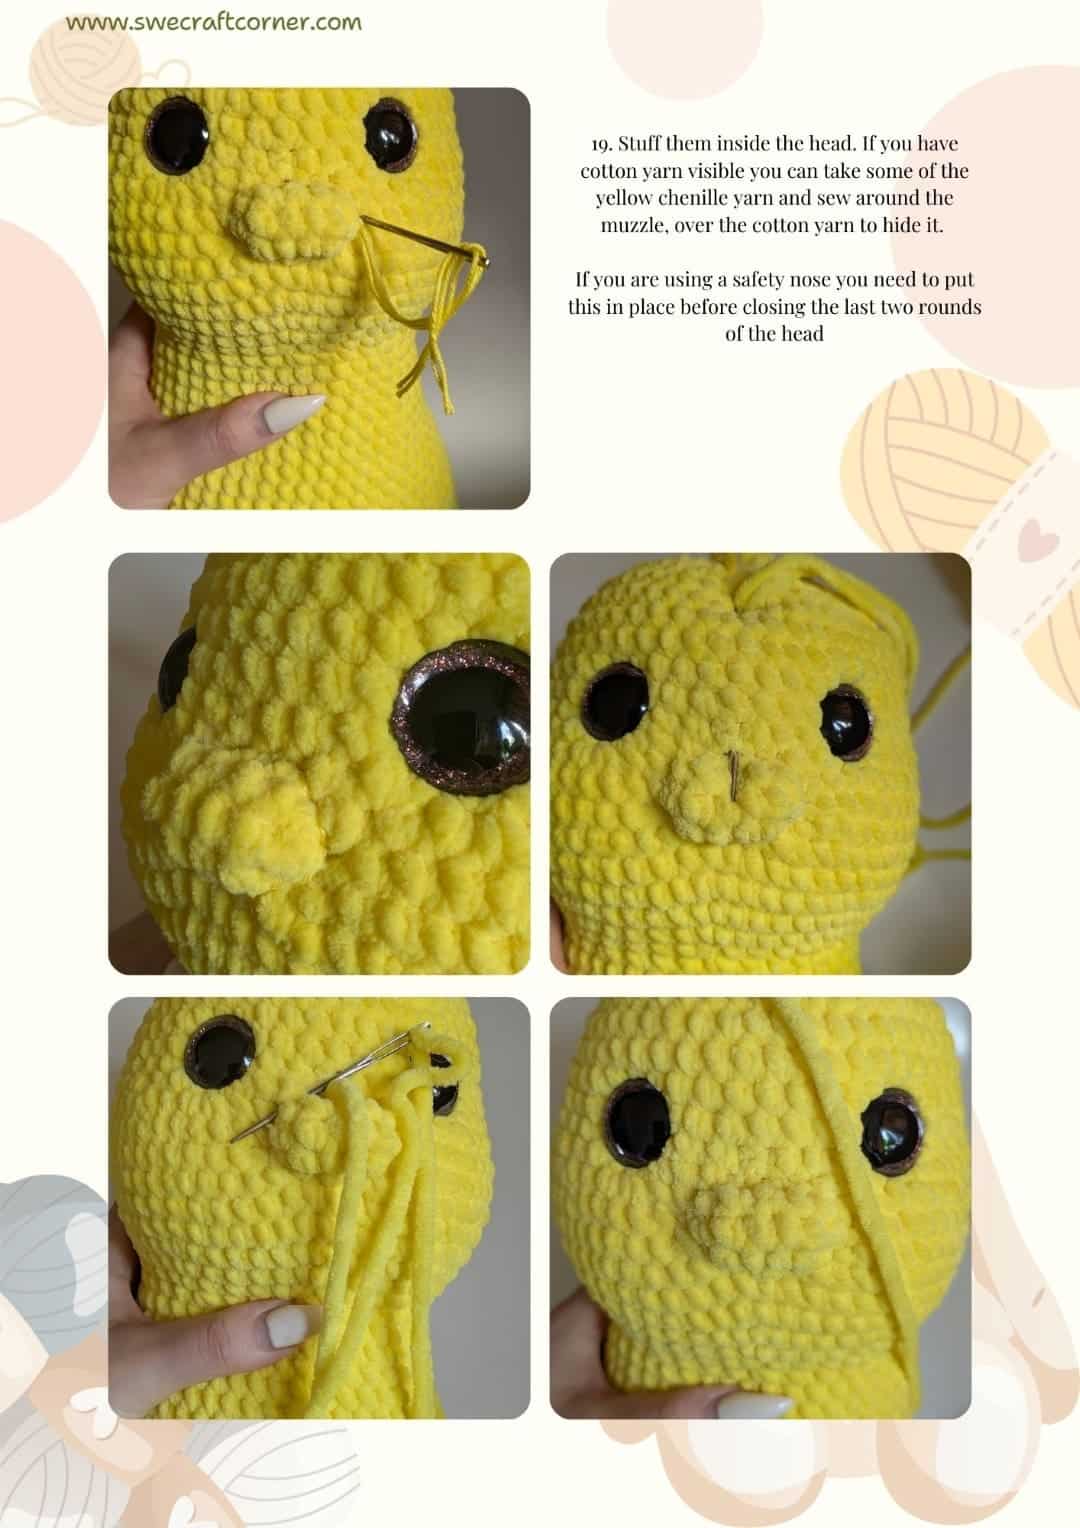
Make the muzzle and assemble your Pikachu
Always work gently to avoid puckering or pulling the plushie’s face out of shape.
You can adjust exactly how many stitches you move to the right/left, and how many rounds up/down, based on the size and shape you want for the mouth curve.
If you’re inserting a safety nose, do this before closing the last two rounds of the head