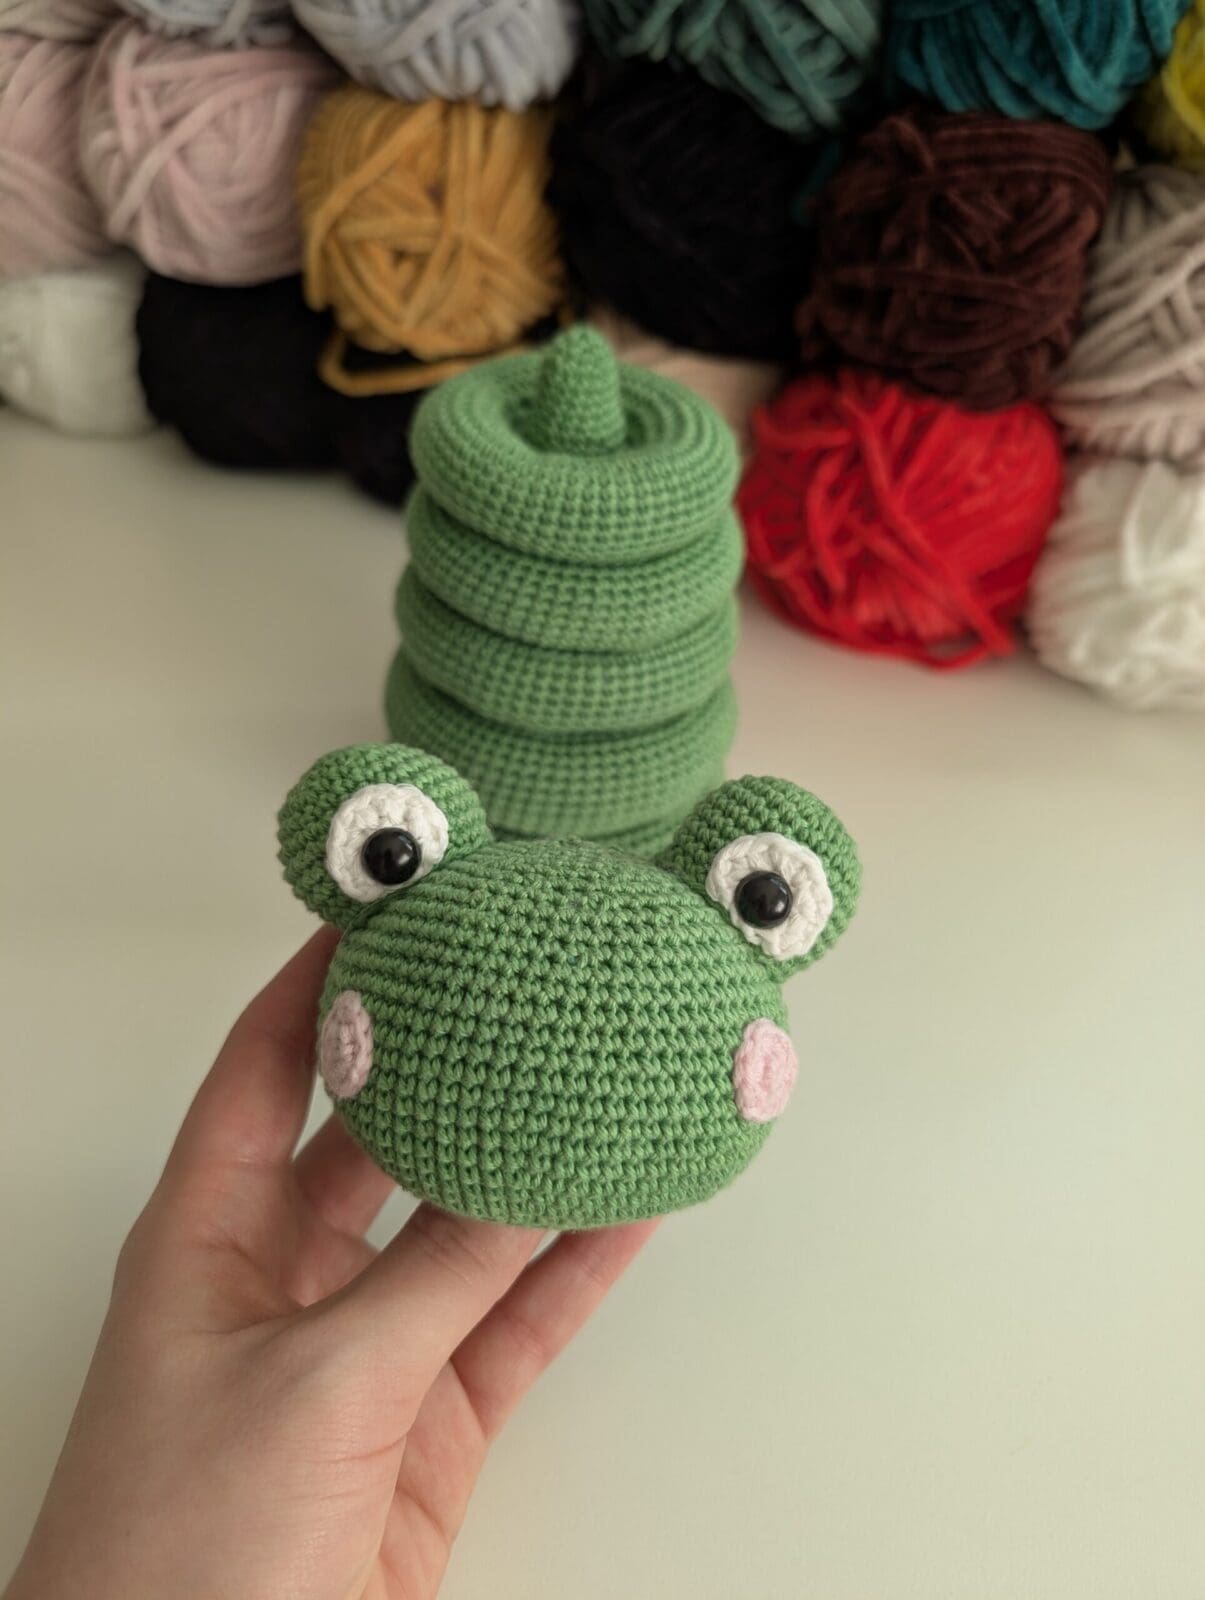
Free Frog Crochet Stacking Toy Pattern: Soft stacking ring toy
Looking for a fun and adorable crochet project that kids will love? This free crochet frog stacking toy pattern is perfect for playtime and learning.
Made with soft yarn and stackable rings in different sizes, it helps little ones practice coordination while playing with the cutest frog ever!
Whether you're a confident beginner or an experienced crocheter, this pattern includes everything you need.
Don’t forget to check out my other free baby patterns!
Table of contents
Material information:
Yarn: 2 skeins of Green DK weight cotton yarn, some white DK weight cotton yarn for the eyes and some pink DK weight cotton yarn for the cheeks.
Crochet hook: 2,5mm and 3,0mm
Safety eyes: 10mm
Fiber fill
Stitch marker
Tapestry needles for weaving in ends and assembling the head.
Would you like to save this?
Abbreviations: US crochet terms
Mr – Magic ring
Ch – chain
Sl st – slip stitch
Sc – single crochet
Inc – Increase st, 2 sc in 1 st
Sc2tog – decrease, 2 sc made to become 1 sc
Blo – back loop only
Copyright notice
This crochet pattern is copyrighted and for personal use only. You may sell finished items made from these patterns. I would appreciate credit for the design. Please do not reproduce, share, alter or claim this pattern as your own.
© 2025 Swecraftcorner. All rights reserved. https://www.swecraftcorner.com
Let's Begin!
Pro tip
To adapt this stacking toy
Use different colored yarn to make it more fun and engaging for a baby to play with. The first stacking toy i made for my daughter was made in amazing soft pastels and she LOVED it!
Pattern
Step-by-step written pattern for the stacking ring toy
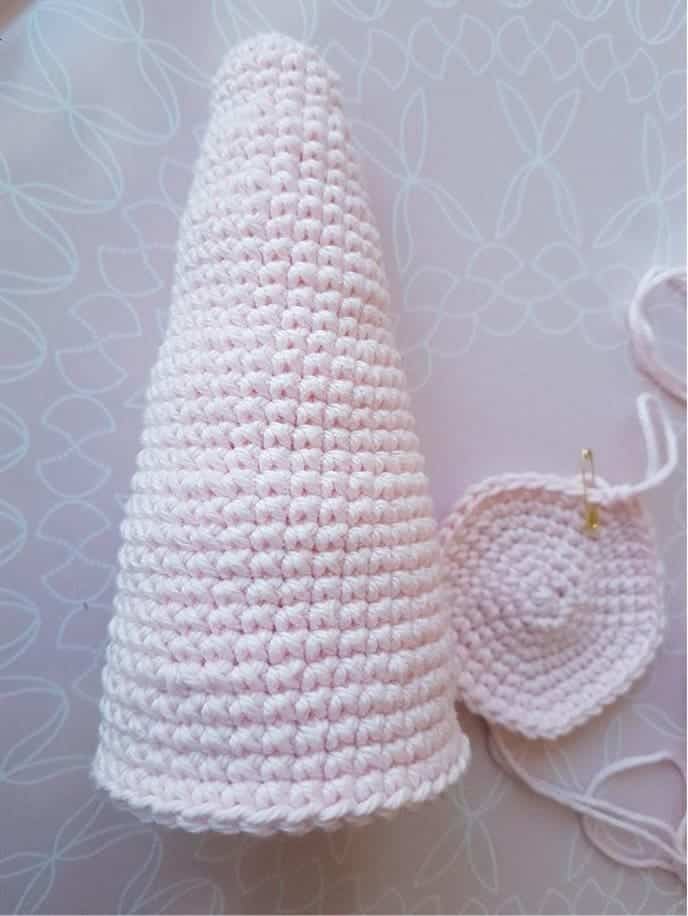
- Crochet the Base cone
Using green cotton yarn and 2,5mm crochet hook
Make a mr
1. 5sc in mr (5)
2. Inc x 5 (10)
3. [sc, inc] x 5 (15)
4-7. sc in each st (15)
8. [2sc, inc] x 5 (20)
9-16: sc in each st (20)
17. [3sc, inc] x 5 (25)
18-24. sc in each st (25)
25. [4sc, inc] x 5 (30)
26-32. sc in each st (30)
33. [5sc, inc] x 5 (35)
34-40. sc in each st (35)
41. [6sc, inc] x 5 (40)
42-43: sc in each st (40)
44. [9sc, inc] x 4 (44)
45. sc in each st (44) Fasten off.
- Base of Cone for the stacking toy
Using green cotton yarn and 2,5mm crochet hook
Make a mr
1. 5sc in mr (5)
2. Inc x 5 (10)
3. [sc, inc] x 5 (15)
4. [2sc, inc] x 5 (20)
5. [3sc, inc] x 5 (25)
6. [4sc, inc] x 5 (30)
7. [5sc, inc] x 5 (35)
8. [2sc, inc, 3sc, inc] x4, 2sc, inc, 4sc (44)
Fill the cone with fiber fill, match the stitches from bottom to the stitches on the cone and sl st them together, fasten of and weave in ends.
- Base Ring
Using green cotton yarn and 2,5mm crochet hook
Ch 44, sl st tog to create a circle (44)
1. sc in each ch (44)
2. [sc, inc] x 22 (66)
3-20. sc in each st (66)
21. [sc, sc2tog] x 22 (44)
22. sc in each st (44)
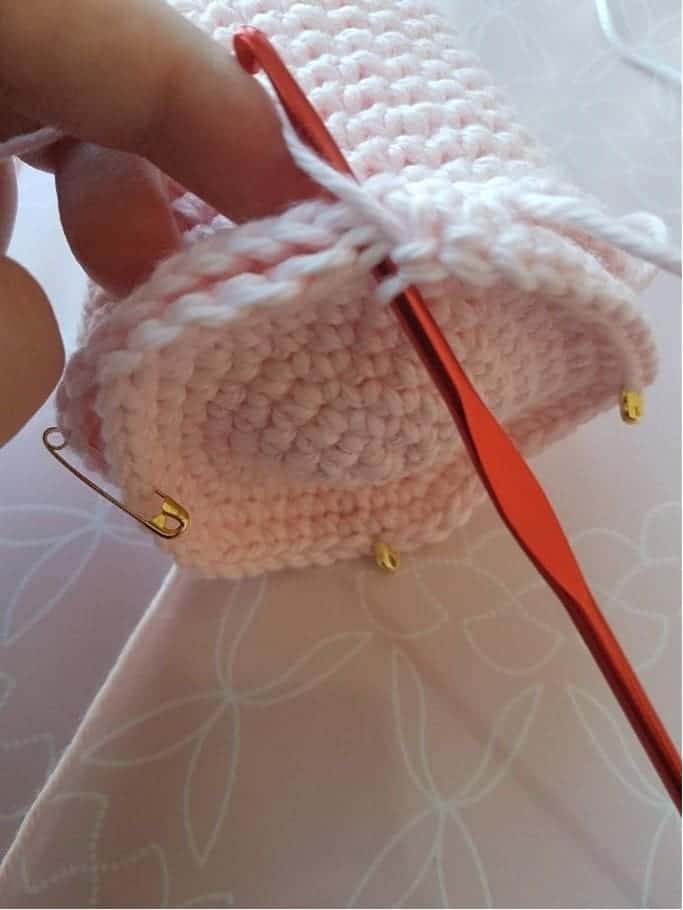
- Assembling the base.
Fold beginning and end of base ring towards each other, place over bottom of cone with bottom of cone upwards. match bottom of cone with the openings of the ring (Both sides of the ring), sew through all the layers (2 on ring and your stitches on bottom of cone) all around and fill ring as you go.
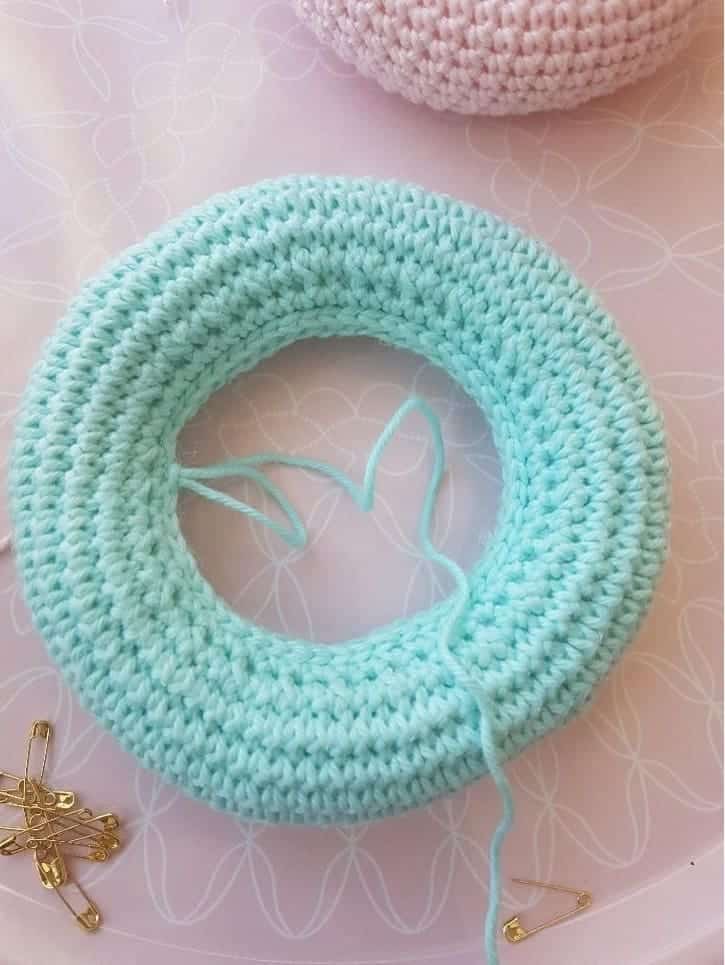
When you have sewn all around and secured your ends, fold the ring over, the seam will be in the middle of the ring. - Crochet the first stacking toy ring
Using green cotton yarn and 2,5mm crochet hook
Ch 46, sl st tog to create a circle (46)
1. sc in each ch (46)
2. [sc, inc] x 23 (69)
3-16. sc in each st (69)
17. [sc, sc2tog] x 23 (46)
18. sc in each st (46)
Fold the ends together, sl st through both sides and fill the ring as you go, fasten of and weave in the ends. - Crochet the second stacking toy ring
Using green cotton yarn and 2,5mm crochet hook
Ch 44, sl st tog to create a circle (44)
1. sc in each ch (44)
2. [sc, inc] x 22 (66)
3-16. sc in each st (66)
17. [sc, sc2tog] x 22 (44)
18. sc in each st (44)
Fold the ends together, sl st through both sides and fill the ring as you go, fasten of and weave in the ends. - Crochet the third stacking toy ring
Using green cotton yarn and 2,5mm crochet hook
Ch 40, sl st tog to create a circle (40)
1. sc in each ch (40)
2. [sc, inc] x 20 (60)
3-16. sc in each st (60)
17. [sc, sc2tog] x 20 (40)
18. sc in each st (40)
Fold the ends together, sl st through both sides and fill the ring as you go, fasten of and weave in the ends. - Crochet the fourth stacking toy ring
Using green cotton yarn and 2,5mm crochet hook
Ch 36, sl st tog to create a circle (36)
1. sc in each ch (36)
2. [sc, inc] x 18 (54)
3-16. sc in each st (54)
17. [sc, sc2tog] x 18 (36)
18. sc in each st (36)
Fold the ends together, sl st through both sides and fill the ring as you go, fasten of and weave in the ends. - Make the frog head to add on top of your stacking ring toy
Using green cotton yarn and 2,5mm crochet hook
Make a mr
1. 6 sc in mr, pull ring tightly (6)
2. Inc x 6 (12)
3. sc in each st (12)
4. [sc, inc] x 6 (18)
5-6. sc in each st (18)
7. [2sc, inc] x 6 (24)
8-9. sc in each st (24)
10. [3sc, inc] x 6 (30)
11-13. sc in each st (30)
14. Working in blo: [sc, inc] x 15 (45)
15. [14sc, inc] x 3 (48)
16. [7sc, inc] x 6 (54)
Once you have completed a few rounds you will see that the shape of the frog’s head will grow up and around. This is the part you will push in before filling your head with fiber fill.
If you want visual guidance for this part you can find a youtube tutorial here!
17. sc in each st (54)
18. [8sc, inc] x 6 (60)
19. sc in each st (60)
20. [9sc, inc] x 6 (66)
21-28. sc in each st (66)
29. [9sc, sc2tog] x 6 (60)
30. sc in each st (60)
31. 4sc, [sc2tog, 8sc] x 5, sc2tog, 4sc (54)
32. sc in each sts (54)
33. [7sc, sc2tog] x 6 (48)
34. 3sc, [sc2tog, 6sc] x 5, sc2tog, 3sc (42)
35. [5sc, sc2tog] x 6 (36)
36. [4sc, sc2tog] x 6 (30)
Stuff head with fiber fill, make sure to have bottom of head (that goes onto stacking toy) turned inwards. I use my thumb to make sure I put the fiber fill round the edges to get a firm head without pushing out the bottom.
37. [3sc, sc2tog] x 6 (24)
38. [2sc, sc2tog] x 6 (18)
39. [sc, sc2tog] x 6 (12)
40. [sc2tog] x 6 (6)
Sew hole on top of head closed and weave in your ends
- Crochet two eyes -
Start with green cotton yarn and 2,5mm crochet hook: Make a mr
1. 6 sc in mr (6)
2. Inc x 6 (12)
3. [sc, inc] x 6 (18)
4. [2sc, inc] x 6 (24)
5. sc in each st (24)
6. [3sc, inc] x 6 (30)
7-10. sc in each st (30)
11. [3sc, sc2tog] x 6 (24)
Finish of by making a sl st into the following st, cut and fasten your yarn but leave a piece long enough to sew eyes to head. - Make two whites
Using white cotton yarn and 3,0mm crochet hook
Make a mr
1. Make 1sc in mr (11) do not pull the ring tighter then what is needed to fit the safety eyes.
2. Inc x 7, sl st into next st. Cut your yarn but leave a piece long enough to attach the whites to the green eyes. - Crochet two cheeks for the frog head
Using pink cotton yarn and a 3,0mm crochet hook
Make a mr
1. Ch 1, 6sc in mr (6) sl st into first st.
2. Ch 1, inc x 6 (12) sl st into first st. Cut and fasten your yarn but leave a piece long enough to sew cheeks to head. - Now it is time to assemble the head
Sew the cheeks in place with approx. 17 single crochets in between.
Sew the whites to the greens with the straight edge just above the edge of the green part. Attach safety eyes through both the white and green.
Fill the green with fiberfill and sew them to the head. I sewed mine approx. four rounds from the center. Make sure to attach all ends securely! Always take extra care when making items for small children.