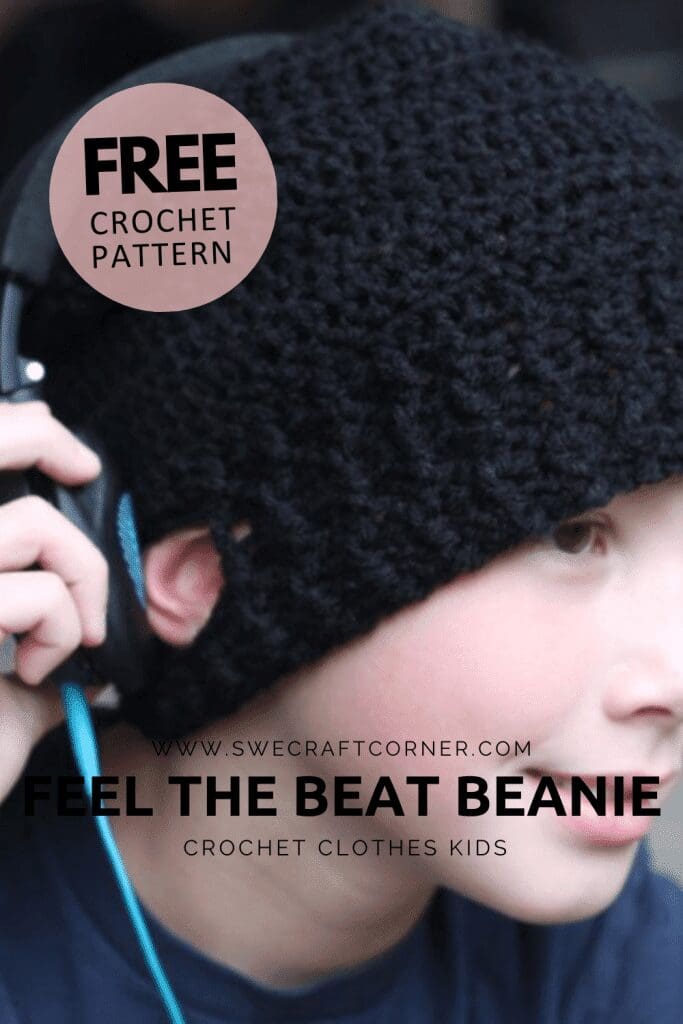
FREE crochet pattern - Feel the beat Beanie, headphones friendly
This is the feel the beat beanie crochet pattern. A beanie that will make even the most anti-beanie kids wear one since it is over ear headphones friendly with holes over the ears that allow for unmuffled sounds.
You will find the whole pattern for free in this post, but you can also buy a printable ad-free copy of this pattern in my Etsy shop.
Have fun crocheting and if you like this pattern don't forget to save this post to your favorite Pinterest board.
Copyright © 2023 Swecraftcorner
This pattern is copyright protected and the property of swecraftcorner and may not be reproduced, sold, copied, or altered in any way, shape or form, please respect this, of course you can share the link directly. You may sell finished item that you made with this pattern (but not in wholesale or mass produce) as long as you credit me for design and include a link back to my webpage www.swecraftcorner.com. You may not use my pictures when selling your finished item. If you love the pattern please share the link with your friends, I would be so happy if you did!
Disclaimer
This Post may contain affiliated links, clicking on those links do not cost you a penny, unless you make a purchase in which case I may get a small commission at NO extra cost to you! However, I never recommend yarn or products I don't actually like myself!
This post contain ads, the ads are the reason I can provide you with this pattern for free, if you want to help me provide free patterns I would love if you pinned this post to your Pinterest and followed me!
If you want ad free and printable versions of my patterns you can find most of them in my shop.
Pattern info
You can check out my collected pattern info below if you need more guidance when working with one of my patterns.
Pattern info specifically to this pattern:
The pattern comes in 2 sizes.
Ch 2 counts as the first st of each row.
This pattern is worked in the round with each round being joined at the end. And then turned and worked in the opposite direction.
If you need any clarification on the terms I use you can see them below.
Materials
100-130 gr of worsted weight yarn.
Hook: 5,5 mm
Gauge: 12dc x 7 rows = 10x10 cm / 4” square
54-56cm/21"-22"
Make an mr.
1. Ch 2, 9 dc in mr sl st, (10)
2. Ch 2 turn, 1 dc in same as ch 2, 2dc in each st, sl st, (20)
3. Ch 2 turn, 2 dc, *1 dc, 2dc* x 9, sl st, (30)
4. Ch 2 turn, 1 dc, 2dc, *1 dc in 2 sts, 2dc* x 9, sl st, (40)
5. Ch 2 turn, 1 dc in 2 sts, 2dc, *1 dc in 3 sts, 2dc* x 9, sl st, (50)
6. Ch 2 turn, 1 dc in 3 sts, 2dc, *1 dc in 4 sts, 2dc* x 9, sl st, (60)
Would you like to save this?
7-16. Ch 2 turn, 1 dc in each st sl st, (60)
For more or less slouch in the beanie, add or remove rows before starting row 17, add or remove rows in 2.

17. Ch 2 turn, 1 hdc in each st sl st, (60)
18. Ch 2 turn, *fpdc, bpdc* x 4, *fpsc, bpsc* x 2, 1fpsc

19. Ch 2 turn, * bpdc, fpdc* x 4, ch 7, sk 5 posts, *fpdc, bpdc* x 16, fpdc, ch 7, sk 5 posts, *fpdc, bpdc* x 4, sl st, (64)
20. Ch 2 turn, *fpdc, bpdc* x 4, ch 7, sk ch 7 from prev round, *bpdc, fpdc* x 16, 1 bpdc, ch 7, sk ch 7 from prev round, *bpdc, fpdc* x 4, sl st, (64)

Now you will work through both chains at the same time, go through the chain from round 19 first and then round 20 chain,
21. Ch 2 turn, *bpdc, fpdc* x 4, sk 1 ch, 1 sc in ch 2, 3, 4, 5 and 6, sk last ch, *fpdc, bpdc* x 16, 1 fpdc, sk 1 ch, 1 sc in ch 2, 3, 4, 5 and 6, sk last ch, *fpdc, bpdc* x 4, sl st, (60)

22. ch 2 turn, *fphdc, bphdc * x 29, 1 fphdc, sl st, fasten off weave in ends
If you wish to have a longer brim, repeat row 22.
57-60cm/22.5"-23.6"
1. Ch 2, 9 dc in mr sl st, (10)
2. Ch 2 turn, 1 dc in same as ch 2, 2dc in each st, sl st, (20)
3. Ch 2 turn, 2dc, * 1 dc, 2dc* x 9, sl st, (30)
4. Ch 2 turn, 1 dc, 2dc, * 1 dc in 2 sts, 2dc* x 9, sl st, (40)
5. Ch 2 turn, 1 dc in 2 sts, 2dc, * 1 dc in 3 sts, 2dc* x 9, sl st, (50)
6. Ch 2 turn, 1 dc in 3 sts, 2dc, * 1 dc in 4 sts, 2dc* x 9, sl st, (60)
7. Ch 2 turn, 1 dc in 4 sts, 2dc, * 1 dc in 5 sts, 2dc* x 9, sl st, (70)
8-18. Ch 2 turn, 1 dc in each st, sl st, (70)
For more or less slouch in the beanie, add or remove rows before starting row 19, add or remove rows in 2.
19. Ch 2 turn, 1 hdc in each st, sl st, (70)
20. Ch 2 turn, *fpdc, bpdc* x 5, *fpsc, bpsc* x 2, 1 fpsc, *bpdc, fpdc* x 19, 1 bpdc, *fpsc, bpsc* x 2, 1 fpsc, *bpdc, fpdc* x 5, sl st, (70)
21. Ch 2 turn, *bpdc, fpdc* x 5, ch 7, sk 5 posts, *fpdc, bpdc* x 19, 1 fpdc, ch 7, sk 5 posts, *fpdc, bpdc* x 5, sl st, (74)
22. Ch 2 turn, *fpdc, bpdc* x 5, ch 7, sk ch 7 from prev round, *bpdc, fpdc* x 19, 1 bpdc, ch 7, sk ch 7 from rev round, *bpdc, fpdc* x 5, sl st, (74)
Now you will work through both chains at the same time, go through the chain from round 21 first and then round 22 chain,
23. Ch 2 turn, *bpdc, fpdc* x 5, sk 1 ch, 1 sc in ch 2, 3, 4, 5, and 6, sk last ch, *fpdc, bpdc* x 19, 1 fpdc, sk 1 ch, 1 sc in ch 2, 3, 4, 5, and 6, sk last ch, *fpdc, bpdc* x 5, sl st, (70)
24. Ch 2 turn, *fphdc, bphdc * x 34, 1 fphdc, sl st, fasten off weave in ends.
If you wish to have a longer brim, repeat row 24
If you like or even love this pattern and want me to create and share more free patterns I would really appreciate it if you would share this like with your friends or pin it to your Pinterest!