FREE PDF crochet pattern - Baby Stacking toy
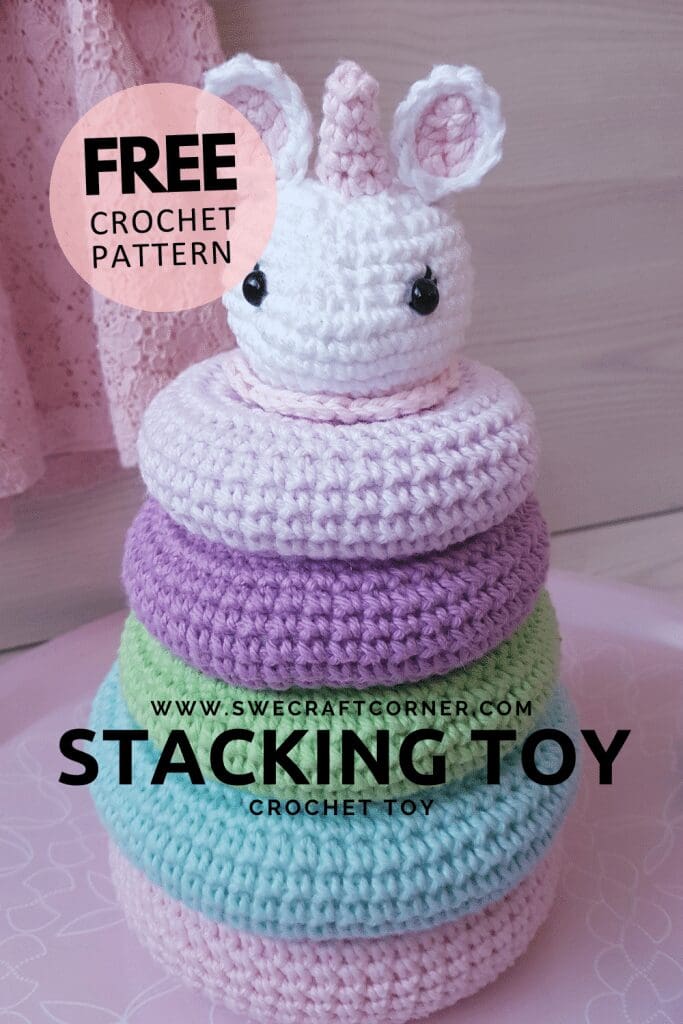
This stacking toy pattern is the perfect crochet baby toy. Soft crochet toys with 100% cotton yarn will be appreciated by any parent and child since they can be washed in 60°C and have no sharp edges. Crochet each ring in a different and fun color and the baby will love it.
Have fun crocheting and if you like this pattern, don't forget to save this post to your favorite Pinterest board.
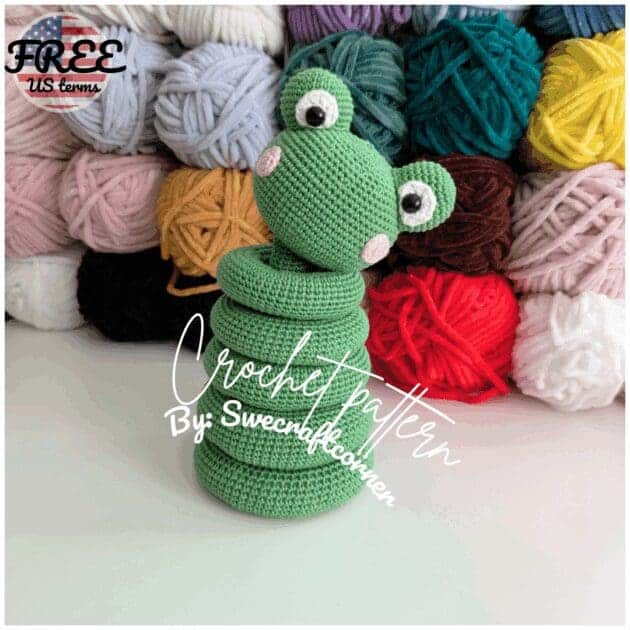
If you would like a frog stacking toy instead, you can find my free frog stacking toy pattern here! And with a helpful video!
Copyright © 2023 Swecraftcorner
This pattern is copyright protected and the property of swecraftcorner and may not be reproduced, sold, copied, or altered in any way, shape or form, please respect this, of course you can share the link directly. You may sell finished item that you made with this pattern. You may not use my pictures when selling your finished item. If you love the pattern please share the link with your friends, I would be so happy if you did!
Disclaimer
This Post may contain affiliated links, clicking on those links do not cost you a penny, unless you make a purchase in which case I may get a small commission at NO extra cost to you! However, I never recommend yarn or products I don't actually like myself!
This post contain ads, the ads are the reason I can provide you with this pattern for free, if you want to help me provide free patterns I would love if you pinned this post to your Pinterest and followed me!
If you want ad free and printable versions of my patterns you can find most of them in my shop.
Pattern info
You can check out my collected pattern info below if you need more guidance when working with one of my patterns.
If you need any clarification on the terms I use you can see them below.
Materials
Yarn: Worsted weight in 6 colors Base: approx. 100m Rings: approx. 50m per ring Head: approx. 50m
Hook: 3,5 mm
Safety eyes
Toy stuffing
Stitch marker or safety pin
Tapestry needle
Scissors
Head:
1. Start with a magic ring, make 6 sc in the ring, pull ring tight
2. Make 2 sc in each st = 12sc, place marker in last st and move up each round
3. *1sc in next st, 2sc in next*, repeat 6 times=18sc
4-7. 1 sc in each st
8. Sc in back loop only, *2 sc in next st, 1sc in next st* 9 times = 27sc
9. 1 sc in each st
10. *1sc in next two sts, 2sc in next st*, 9 times = 36 sc
11-14. 1sc in each st
15. 1 sc in next 15 st, sc2tog 3 times, 1 sc in each of the remaining 15 sts
16. 1 sc in next 16 sts, sc2tog, 1 sc in each remaining sts
17. Now we decrease. *1 sc in next 3 sts, sc2tog* 6 times, 1 sc in each of the two remaining sts
18. *1 sc in the next two sts, * sc2tog 6 times, 1 sc in each of the last two stitches press the bottom of the head in, creating a hole in the bottom of the head.
Sew on the eyes.
Fill the head.
19. *sc2tog, 1sc*, 6 times, finish with sc2tog = 14 sts
20. Sc2tog all around = 7 sts
If needed stuff the head a bit more, sew trough every loop and pull the ring close, weave in ends and cut away loose treads.

Optional:
Collar:
In the front loops at the end of the head, find the middle and fasten the yarn.
1. Chain 4, sc in third st, ch 4, skip two st, sc in next st, repeat, in the end there will only be a skip of 1 st
2. 5 dc in chain, 1 sc in sc from prev round, repeat, sl st into last st. Fasten and weave in ends.
Ears:
Make 2 white and 2 in pink Chain 6 In third chain from hook, make a dc, in the following st make a hdc and in the last st make 3 sc, on the other side of the chain make 1 hdc and two dc.
Place the white and the pink ear with wrong sides tog, make 1 sc in each st around. Sew the ears on to the head.
Tip: Want to customize your toy, make round ears and skip the horn and you have a mouse!
Horn:
Make a magic ring, make 7 sc and pull ring tightly, make 1 sc in each st all way round in a spiral, until you like the size of the horn, pull yarn trough and fasten off.
Sew securely on to the head.
Don't forget to save this FREE pattern on Pinterest to easily find it any time you need it.
Cone:
1. Start with a magic ring. Make 5 sc
2. Make 1 sc, place marker in stitch, this will be the beginning of each round, move the marker in the first stitch on each round as you go. Make one more sc in same st, 2 sc in each remaining st. = 10sc
3. *1sc, 2 sc in next st*, five times = 15sc
4-6. 1 sc in each st
7. *1 sc in 2 sts, 2 sc in next st*, five times = 20sc
8-10. 1 sc in each st
Would you like to save this?
11. *1 sc in 3 sts, 2 sc in next st*, five times = 25sc
12-17. 1 sc in each st
18. *1 sc in 4 sts, 2 sc in next st*, five times = 30sc
19-24. 1 sc in each st
25. *1 sc in next 5 sts, 2sc in next st*, five times = 35sc
26-32. 1 sc in each st
33. *1 sc in 6 sts, 2 sc in next st*, five times = 40sc
34-35. 1 sc in each st
Bottom: Same color as cone
1. Make a magic ring, 5 sc
2. Make 1 sc, place marker in stitch, this will be the beginning of each round, move the marker in the first stitch on each round as you go. Make one more sc in same st, 2 sc in each remaining st.
3. *1 sc, 2 sc in next st*, five times = 15sc
4. *1 sc in 2 sts, 2 sc in next st*, five times = 20sc
5. *1 sc in 3 sts, 2 sc in next st*, five times = 25sc
6. *1 sc in 4 sts, 2 sc in next st*, five times = 30sc
7. *1 sc in 5 sts, 2sc in next st*, five times = 35sc
8. *1 sc in 6 sts, 2 sc in next st*, five times = 40sc
Fill the cone with stuffing, match the bottom to the cone and sl st them together fasten of and weave in ends.
Base ring:
Ch 40, sl st together
1. 1 sc in each st
2. *1 sc, 2 sc in next st*, 20 times = 60sc
3-16. 1 sc in each st
17. *1 sc, sc2tog*, 20 times = 40 sts
18. 1 sc in each st
Fold the beginning and the end of the ring towards each other, place over bottom of the cone with the bottom of the cone upwards. Match the bottom of the cone with the openings of the ring, sew all around and fill the ring as you go. When you have sewn all around fold the ring over, the seam will be in the middle of the ring.
If you want to make the cone look like a unicorn horn, you can pull the yarn trough to the right side of the base and twist it round the cone, to make it safe for the baby to play with, pull the yarn trough a few sts along the way, and fasten the yarn securely at the top.
Rings:
All the rings are made the same, the only thing that is different is the number of chains you start with.
Ring 1:
Ch 46, sl st tog to make a circle
1. 1 sc in each st = 46 sc
2. *1 sc, 2 sc in next st* 23 times
3-11. 1 sc in each st
12. *1 sc, sc2tog* 23 times
13. 1 sc in each st
Fold the ends together, sl st through both sides and fill the ring as you go, fasten of and weave in the ends.
Ring 2:
Ch 40, sl st tog to make a circle
1. 1 sc in each st = 40 sc
2. *1 sc, 2 sc in next st* 20 times
3-11. 1 sc in each st
12. *1 sc, sc2tog* 20 times
13. 1 sc in each st
Fold the ends together, sl st through both sides and fill the ring as you go, fasten of and weave in the ends.
Ring 3:
Ch 36, sl st tog to make a circle
1. 1 sc in each st = 36 sc
2. *1 sc, 2 sc in next st* 18 times
3-11. 1 sc in each st
12. *1 sc, sc2tog* 18 times
13. 1 sc in each st
Fold the ends together, sl st through both sides and fill the ring as you go, fasten of and weave in the ends.
Ring 4:
Ch 30, sl st tog to make a circle
1. 1 sc in each st = 30 sc
2. *1 sc, 2 sc in next st* 15 times
3-11. 1 sc in each st
12. *1 sc, sc2tog* 15 times
13. 1 sc in each st
Fold the ends together, sl st through both sides and fill the ring as you go, fasten of and weave in the ends.
If you like or even love this pattern and want me to create and share more free patterns I would really appreciate it if you would share this like with your friends or pin it to your Pinterest!