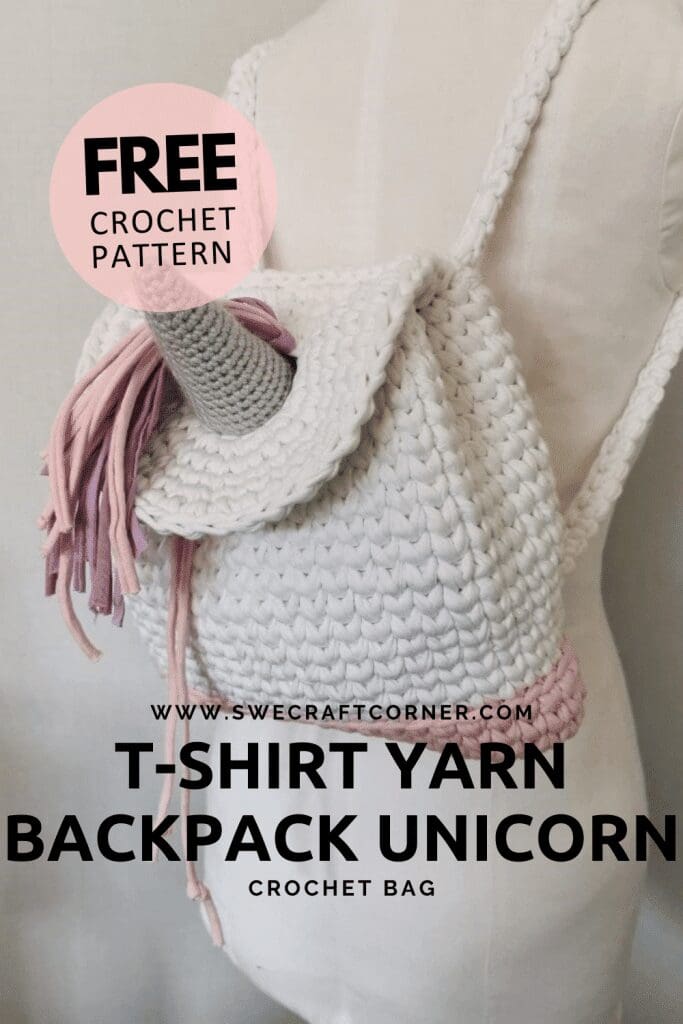
FREE crochet pattern - T-shirt yarn backpack, Unicorn
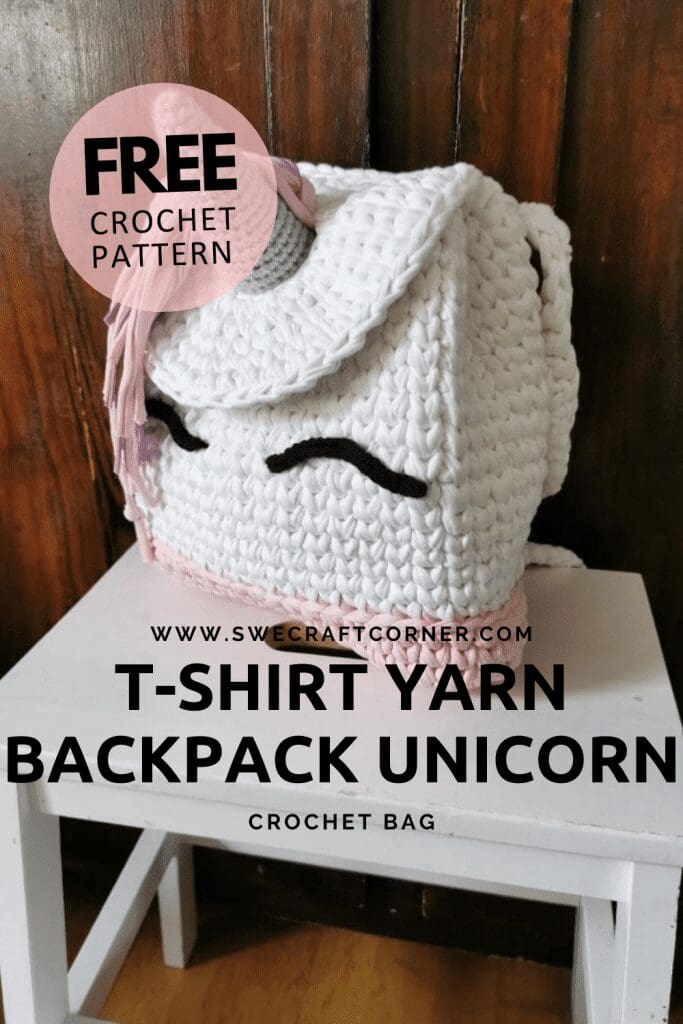
This fun crochet backpack is made with t-shirt yarn and has an extra fun feeling with the unicorn horn as a way of sealing the lid. Super fun to crochet for kids all ages. The pattern has step by step pictures to show you how to crochet the bag and will make it an easy pattern for beginners as well as advanced crocheters.
Have fun crocheting and if you like this pattern don't forget to save this post to your favorite Pinterest board.
Copyright © 2023 Swecraftcorner
This pattern is copyright protected and the property of swecraftcorner and may not be reproduced, sold, copied, or altered in any way, shape or form, please respect this, of course you can share the link directly. You may sell finished item that you made with this pattern. You may not use my pictures when selling your finished item. If you love the pattern please share the link with your friends, I would be so happy if you did!
Disclaimer
This Post may contain affiliated links, clicking on those links do not cost you a penny, unless you make a purchase in which case I may get a small commission at NO extra cost to you! However, I never recommend yarn or products I don't actually like myself!
This post contain ads, the ads are the reason I can provide you with this pattern for free, if you want to help me provide free patterns I would love if you pinned this post to your Pinterest and followed me!
If you want ad free and printable versions of my patterns you can find most of them in my shop.
Pattern info
You can check out my collected pattern info below if you need more guidance when working with one of my patterns.
Pattern info specifically to this pattern:
Since tshirt yarn tends to differ in size and thickness I recommend making the test circle before starting.
When the pattern reads inc x2 you make 2sc/vsc in the next 2 sts.
When the pattern reads sc x12 or vsc x12, you make 1 sc/vsc in the next 12 sts.
Unless otherwise stated the pattern is worked in the round and each round is joined by a slip stitch and then a chain 1.
If you need any clarification on the terms I use you can see them below.
Terms info specifically to this pattern:
3vsc – 3 vsc in the same st
Inc – 2sc/vsc in 1 st
Materials
Yarn: Hooked spaghetti approx. 1 spool of white and ½ of pink, some black aran weight yarn for the eyes, and some grey bulky weight yarn for the horn.
2 D-rings approx. 1”
Hooks: 7,0mm, 4,5mm and 3,0mm
Stitch markers
Scissors
A blunt needle with a large eye
Measuring tape
How to make vsc and check gauge
To check that your basket will be a good size you will work 3 rounds of vsc.
1. Mr, 8sc in mr, sl st, ch 1(8)
2. 2vsc in each st, sl st, ch 1 (16)
3. *1vsc, 2vsc in next st* x8 sl st (24)
Now measure your circle it should fit just inside 4” (~10cm).
If its much bigger or smaller you might want to consider changing your hook size.
Time to begin!
Start with with pink colored T-shirt yarn and 7mm hook.
Ch 15
1. In second ch from hook make 2 sc, sc x12, 4sc in last ch, now working the other side of the ch, sc x12, 2sc in last st, sl st, ch1 (32)
2. Inc x2, sc x12, inc X4, sc x12, inc X2, sl st, ch1 (40)
3. 2sc X2, sc X16, incX4, scx16, inc x2, sl st, ch1 (48)
4-6. Sc X48, sl st, ch1
Change to white.
7. Working in back loop only, sc x48, sl st, ch1
8-24. sc x48, sl st, ch 1 (on last round finish with a false stitch instead of a sl st) Find instructions for how to make the false stitch here!
Lid
Ch 14, close the ch to a circle, ch 1
1. Inc x 13, ss, ch 1 (26)
2. Vsc x3, 3vsc into next st, vsc x18, 3vsc into next st, vsc x3 (30)
3. Vsc x4, 3vsc into next st, vsc x20, 3vsc into next st, vsc x4 (34)
4. Vsc x5, 3vsc into next st, vsc x5, inc, vsc x3, inc, vsc x3, inc, vsc x7, 3vsc into next st, vsc x5 (41)
5. Vsc x6, 3vsc into next st, vsc x27, 3vsc into next st, vsc x6 close (45)
Horn
Using bulky weight yarn and a 4.5mm crochet hook.
The horn and base are worked in continuous rounds.
Make a mr.
1. 6sc in mr (6)
2. *inc, sc* x3 (9)
3. Sc x9
4. *inc, scx2* x3 (12)
Would you like to save this?
5. Sc x12
6. *inc, scx3* x3 (15)
7. Sc x15
8. *inc, scx4* x3 (18)
9. Sc x18
10. Sc x18
11. *inc, scx5* x3 (21)
12. Sc x21
13. Sc x21
14. *inc, scx6* x3 (24)
15. Sc x24
16. Sc x24
17. *inc, sc x7* x3 (27)
18. Sc x27
19. Sc x27
Cut yarn and make the bottom of the horn.
Make a mr.
1. 6sc in mr (6)
2. Inc x6 (12)
3. *inc, sc x1* x6 (18)
4. *inc, sc x2* x6 (24)
5. *inc, sc x7* x3 (27)
Attach the base to the horn.
Make 1 sc through both pieces all the way round, stuff the horn before you close the horn.
The horn should measure about 6,7 inches (~17 cm) at the base.
Straps
Chain until your chain measures as followed:
Child: 54” (137 cm)
Youth: 58” (147,3 cm)
Adult: 60” (152,4 cm)
In second chain from hook, make 1 sc in each st across the chain, cut yarn and leave enough for sewing the strap in place.
Eyes
Using black aran weight yarn and 3,0mm hook.
Ch 18
Start in second ch from hook, sc x5, *inc, sc* x 4, sc x2, sk1, ss into last st, cut yarn and make another eye
Assembling the bag
Start by folding the bag in half, find your center back stitch and place a marker in it, count 6 stitches to the right and place a marker in the 7th stitch.
Place a marker in the center stitch on the top of the lid, count 6 stitches to the right and place a marker in the 7th stitch.
Match the markers, starting in the marker placed in the 7th st, pull the yarn through, then sl st x 14, cut yarn and weave in your ends.
String
This is done to your preference.
Take approx. 10” (25,4 cm) of your preferred yarn, fold it in half, starting from the back, take one end of the yarn and pull through to the inside, do the same with the other end, you should have 7 sts in between were your ends go in, skip 8 sts and pull the yarn to the outside, skip 2 sts and pull the yarn to the inside, skip 9 sts and pull the yarn to the outside. Repeat for the other side. Decide the length of your strings and cut them to desired length, tie a knot at the end.
D-rings
Sew the d-rings in place on the back of the back pack, or by following the pictures available in the PDF download below.
Straps
Pull the straps through the rings from the top, one end of the strap in each ring. Make sure not to twist your strap. In the first round of the white in line with the first and last ch of your base starting chain, sew the strap down on each side. Make sure to secure your yarn.
Don't forget to save this FREE pattern on Pinterest to easily find it any time you need it.
Horn
Right under the strings at the front sew the horn to the bag, make sure to fasten it properly.
Mane
Decide on the length for the mane, take a bunch of scrap yarn (I use different types of t-shirt yarn left overs). Cut them double the length your mane should be, fasten the yarn in the loops inside the hole in the lid.
If you like or even love this pattern and want me to create and share more free patterns I would really appreciate it if you would share this like with your friends or pin it to your Pinterest!