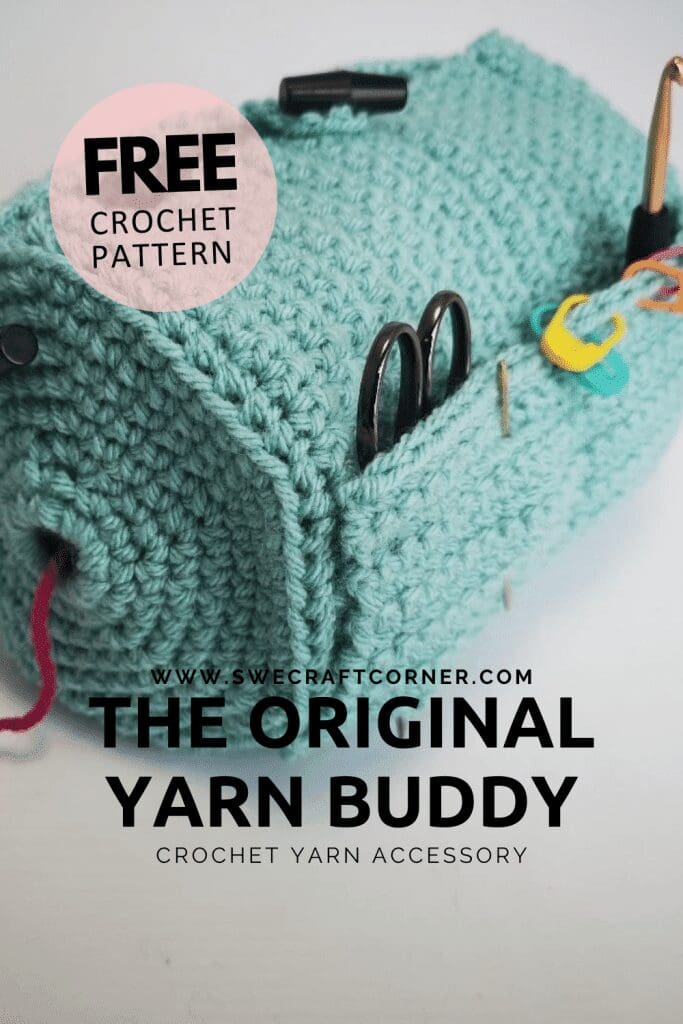
FREE crochet pattern - Yarn buddy, crochet organizer
This is my absolute favorite crochet organizer EVER! The yarn buddy is super handy and keeps your yarn protected from dust and dirt while crocheting on the move.
If you need video guidance, I have a video tutorial available down below.
Have fun crocheting and if you like this pattern don't forget to save this post to your favorite Pinterest board.
Copyright © 2023 Swecraftcorner
This pattern is copyright protected and the property of swecraftcorner and may not be reproduced, sold, copied, or altered in any way, shape or form, please respect this, of course you can share the link directly. You may sell finished item that you made with this pattern. You may not use my pictures when selling your finished item. If you love the pattern please share the link with your friends, I would be so happy if you did!
Disclaimer
This Post may contain affiliated links, clicking on those links do not cost you a penny, unless you make a purchase in which case I may get a small commission at NO extra cost to you! However, I never recommend yarn or products I don't actually like myself!
This post contain ads, the ads are the reason I can provide you with this pattern for free, if you want to help me provide free patterns I would love if you pinned this post to your Pinterest and followed me!
If you want ad free and printable versions of my patterns you can find most of them in my shop.
Pattern info
You can check out my collected pattern info below if you need more guidance when working with one of my patterns.
If you need any clarification on the terms I use you can see them below.
Materials needed for making this crochet organizer
Hook: 5,0mm
Yarn: 2 balls of paintbox simply chunky
Needle
Scissors
Making the yarn buddy:
Ch 8, Sl st into first ch, creating a circle.
1. Ch1, 12 sc over chain, sl st tog (12)
2. Ch1, *1sc, Inc* x 6, sl st tog (18)
3. Ch1, *1sc in 2 sts, inc* x 6, sl st tog (24)
4. Ch1, *1sc in 3 sts, inc* x 6, sl st tog (30)
5. Ch1, *1sc in 4 sts, inc* x 6, sl st tog (36)
6. Ch1, *1sc in 3 sts, inc* x 6, sl st tog (42)
7. Ch1, *1sc in 3 sts, inc* x 6, sl st tog (48)
8. Ch1, *1sc in 3 sts, inc* x 6, sl st tog (54)
9. Ch1, work 1 sc each st in back loop only (54), Ch1 turn
10-21. 1 sc in each st, Ch1 turn (54)
22. 1sc in each st, ch 10 turn (64)
23. Skip ch 10, 1 sc in 54 sts, ch 1 turn (54)
24-37. 1 sc in each s, ch 1 turn (54)
Would you like to save this?
38. 1sc in each st, sl st tog, Ch1 turn (54)
From now on do not turn your work.
39. Working in back loops only, *1sc in 7 sts, dec* x 6, sl st tog, ch 1 (48)
40. *1 sc in 6 sts, dec* x 6, sl st tog, ch 1 (42)
41. *1 sc in 5 sts, dec* x 6, sl st tog, ch 1 (36)
42. *1 sc in 4 sts, dec* x 6, sl st tog, ch 1 (30)
43. *1 sc in 3 sts, dec* x 6, sl st tog, ch 1 (24)
44. *1 sc in 2 sts, dec* x 6, sl st tog, ch 1 (18)
45. *1 sc, dec* x 6, sl st tog, ch 1 (12)
46. *dec* x 6 (6)
Sew the hole shut and fasten yarn.
Pocket:
Ch 26
1. In 2nd ch from hook make 1 sc in each ch, ch 1 turn (25)
2-15. 1sc in each st, Ch1 turn (25)
Strap:
Here you can choose any length you want your strap to be by removing or adding rows before the last buttonhole. Or if you don’t want a strap, you can just skip this part.
Ch 6.
1. In 2nd ch from hook make 1 sc in each st, ch 1 turn (5)
2. 1 sc in each st, ch 1 turn (5)
3. 1 sc, ch 3, skip 3 sts, 1 sc in last st, ch 1 turn (5)
4. 1 sc, 3 sc in ch-sp, 1 sc in last st, ch1 turn (5)
5-160. 1 sc in each st, ch 1 turn (5)
161. 1 sc, ch 3, skip 3 sts, 1 sc in last st, ch 1 turn (5)
162. 1 sc, 3 sc in ch-sp, 1 sc in last st, ch1 turn (5)
163. 1 sc in each st.
Fasten yarn.
Assembling the bag:
Measure where you want to place your pocket, 1 sewed mine in place approx. 9 sts, from the opening. Sew along the short sides and the bottom of the pocket, sew the pocket down in the middle creating 2 pockets.
Sew a button for the closure and one button on each side if you made a strap.
If you like or love this pattern, I would appreciate it if you shared it with your friends. You can also pin it to your Pinterest!